
Ever wanted to transform peaceful city photos into dramatic disaster scenes? This Photoshop technique shows exactly how to do it.
Andrea García breaks down the complete process. You’ll learn how to composite multiple images, add realistic fire effects, and create that perfect apocalyptic atmosphere. Plus, the tutorial covers adding protective gear to models and applying color grading that sells the whole scene.
The best part? You don’t need advanced skills. Just follow the steps and watch ordinary photos become cinematic war scenes.
Start With Your Canvas Setup
First things first. Create a new file in Photoshop with specific dimensions: 1200px width by 1700px height.
Why these numbers? They give you enough vertical space for dramatic composition while maintaining standard web-friendly proportions. Plus, working at this resolution keeps file sizes manageable during editing.
Your base layer matters more than you think. Grab a texture image and apply a Gaussian blur (Filter > Blur > Gaussian Blur). This creates depth right from the start. The blurred texture prevents your final image from looking flat or pasted together.

Think of this base as your foundation. Everything builds from here.
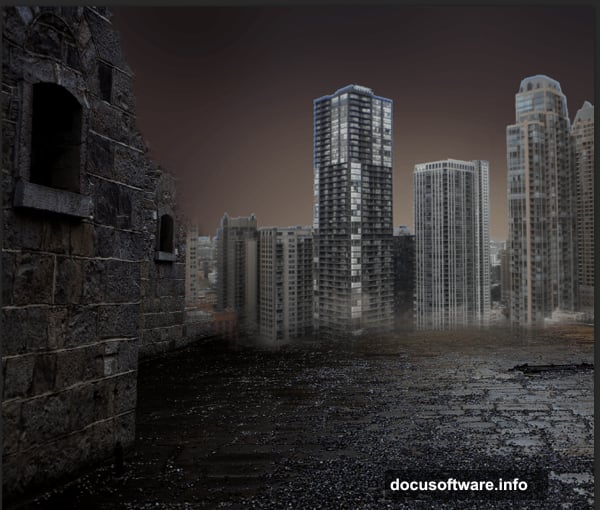
Build Your Destroyed Cityscape
Now comes the fun part. Composite your city scene using multiple stock photos.
Start with a street-level wall image. Place it in your canvas and add a layer mask (found at the bottom of the Layers panel). Then grab a black brush and paint over the mask to hide unwanted areas. Focus on making rough edges along the wall’s outline. Perfection isn’t the goal yet—just get the basic shape right.
Next, add your city buildings. Place the urban skyline image above your wall layer. Create another layer mask and use the Lasso tool to select just the buildings you want. Then paint with black to hide everything else.
Here’s the trick: Change this layer’s blend mode to Multiply. Suddenly, your buildings integrate with the scene instead of floating awkwardly on top. Multiply mode darkens the image and lets lower layers show through naturally.
For the sky, place your dramatic sky photo above everything. Switch its blend mode to Soft Light. This creates atmospheric haze without overpowering your composition.
Add Fire and Destruction
Time to bring the heat. Literally.
Place your first fire image into the scene. Change its blend mode to Soft Light, then adjust opacity to 60% and fill to 50%. This creates ambient flame lighting without overwhelming detail.
But wait—it looks too sharp. Apply a Gaussian Blur with 50px radius (Filter > Blur > Gaussian Blur). Now the fire creates realistic light diffusion instead of looking like a sticker.
Add more fire layers for specific flame areas. For each one, create a layer mask and paint away hard edges. The goal is seamless blending where flames appear to naturally consume the environment.
Remember: Fire casts light. Create a new layer and paint soft black areas around buildings and sky using a brush set to 40% opacity (or pen pressure if you have a tablet). Set this shadow layer to Soft Light mode. These shadows ground your flames in reality.
Add Protective Gear to Models
Want to put a gas mask on your model? Here’s the smart approach.
Find stock photos of gas masks with similar lighting angles to your model. Place the mask image over the model’s face and use Free Transform (Ctrl+T) to resize and position it correctly.
Create a layer mask on the mask layer. Paint with black to hide edges and blend the mask naturally into the model’s face. Pay special attention to where the mask straps would wrap around the head.
Lower the mask layer’s opacity slightly (around 85-90%). This helps it feel connected to the model instead of floating in front. You can also adjust Levels or Curves to match skin tones with mask colors.
For extra realism, add shadows under the mask edges using a soft black brush on a new layer set to Multiply mode.
Apply War Zone Details
Small details sell the apocalypse fantasy.
Add bullet holes using bullet stock images or custom brushes. Scatter them across walls and surfaces. Use layer masks to blend them properly—bullets shouldn’t look stamped on.
Place a radioactive warning sign in the scene. This instantly communicates danger. Angle it slightly and add wear using crack brushes or texture overlays. A pristine sign feels out of place in a war zone.
For the sign pole, find a stick or pole stock photo. Use Free Transform to position it vertically supporting your warning sign. Add shadows beneath it to anchor it to the ground.
Don’t forget environmental damage. Use crack brushes on walls and pavement. Apply them at low opacity (20-30%) so they suggest damage without screaming for attention.
Create Dramatic Color Grading
Color transforms your composite from “photos stacked together” to “cohesive scene.”

Start with a Curves adjustment layer. Push the curve slightly upward in highlights and downward in shadows. This increases contrast dramatically.
Add a Color Balance adjustment layer. In the shadows, push toward blue and cyan (values around -10 to -20). In the midtones, add red and yellow (values around +15 to +25). In the highlights, add yellow (around +10).
This creates a warm, apocalyptic color scheme. The cool shadows contrast beautifully with warm flames and ambient light.
For extra atmosphere, add a Photo Filter adjustment layer. Choose Warming Filter (85) and set opacity to 25-35%. This unifies all elements under consistent lighting.
Finally, create a new layer filled with dark orange (#8B4513) set to Soft Light mode at 15-20% opacity. This adds overall color harmony that ties everything together.
Polish With Final Touches
Almost done. Time for finishing details that elevate the image.

Add atmospheric smoke or dust. Find smoke stock photos, place them in your scene, and set blend mode to Screen. Adjust opacity until they feel like haze rather than obvious additions.
Sharpen selectively. Create a stamped copy of all layers (Ctrl+Alt+Shift+E). Apply Unsharp Mask (Filter > Sharpen > Unsharp Mask) with Amount: 80%, Radius: 1.5px, Threshold: 0. This adds punch to important details.
But sharpening everywhere looks artificial. Add a layer mask to your sharpened layer and paint with black over soft areas like flames and distant buildings. Let sharpness draw attention to your focal points.
Consider adding vignette darkness around edges. Create a new layer, fill it with black, and add a large feathered layer mask revealing only the center. Set to Soft Light at 20-30% opacity.
Why This Technique Works
This approach succeeds because it layers elements logically. You start with foundations and build upward, just like real construction.
The blend modes do heavy lifting. Instead of manually adjusting every layer’s appearance, modes like Multiply and Soft Light create natural interactions between elements. This saves hours of tedious work.

Layer masks are your best friend. They let you blend images non-destructively. Made a mistake? Just paint white over your mask to reveal hidden areas again. No permanent damage, no starting over.
Color grading unifies disparate elements. Your stock photos came from different cameras under different lighting. Color adjustments make them appear photographed together in the same environment.
The details matter. Bullet holes, warning signs, and atmospheric smoke transform a simple composite into a believable scene. Without them, you just have pictures stacked together.
Most importantly, this technique teaches adaptable skills. Once you understand compositing basics, you can create any dramatic scene—not just war zones. The principles apply to fantasy landscapes, sci-fi environments, or surreal portraits.
Practice makes perfect here. Your first attempt won’t look professional. But after creating a few scenes, you’ll develop intuition for what works. You’ll know which blend modes to try first and how much blur creates realistic atmosphere.
Start simple. Pick just three or four stock photos for your first attempt. Master blending those before adding complexity. Then gradually incorporate more elements as your confidence grows.
The tools are straightforward. The real skill is knowing when and how to apply them. That only comes through experimentation.