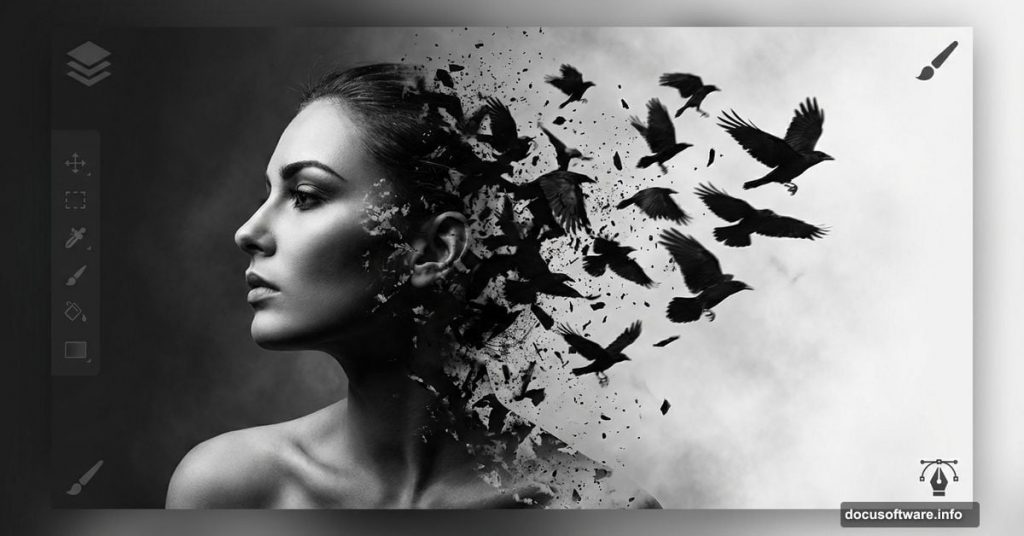
Want to create haunting portraits with dramatic disintegration effects? This Photoshop technique turns ordinary photos into striking abstract art using crows and debris.
The process looks complex but breaks down into manageable steps. You’ll transform a basic portrait into dark, ethereal artwork that stands out. Plus, the techniques work for any abstract photo manipulation project.
Let’s walk through how to build this effect from scratch.
Set Up Your Dark Canvas
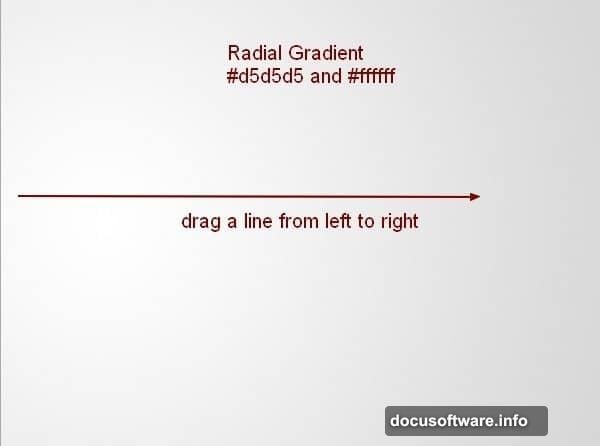
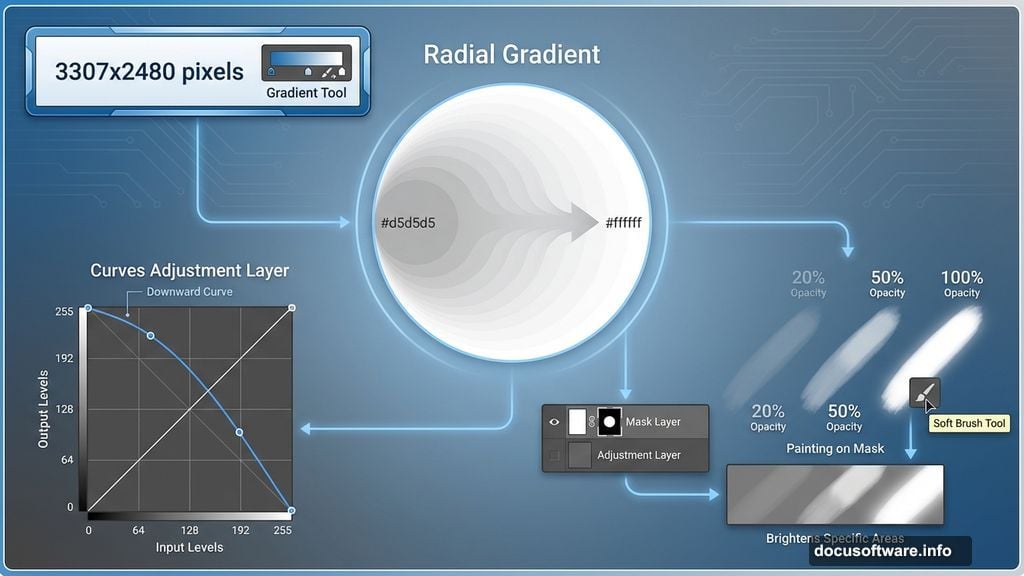
Start with a 3307×2480 pixel document filled with white. Create a new layer and grab the Gradient Tool.
Choose Radial Gradient with these colors: #d5d5d5 and white (#ffffff). Drag from left to right across your canvas. This creates subtle depth without overpowering your subject.
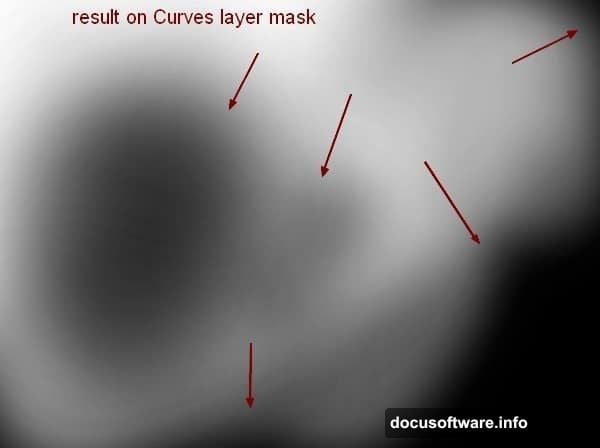
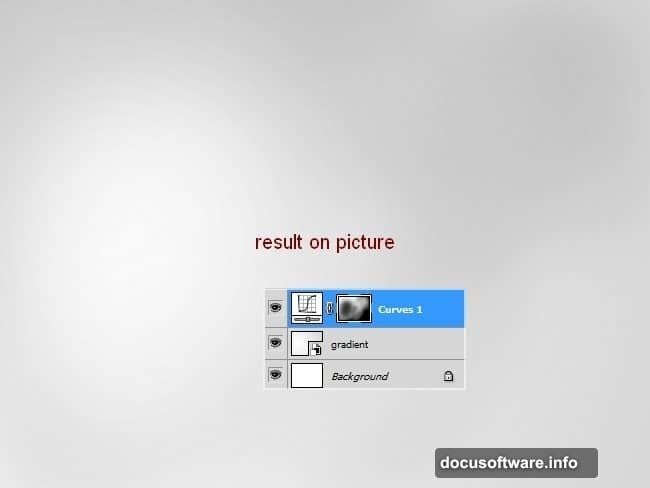
Next, add a Curves adjustment layer. Decrease the overall lightness to establish that moody atmosphere. But here’s the trick: don’t make everything dark.
Use a soft brush at varying opacity (20-100%) on the Curves layer mask. Paint to brighten specific areas. This creates dimension and guides the viewer’s eye naturally through your composition.
Create The Disintegration Effect
Extract your model and position her on the left side of your canvas. Now comes the signature technique that makes this effect work.
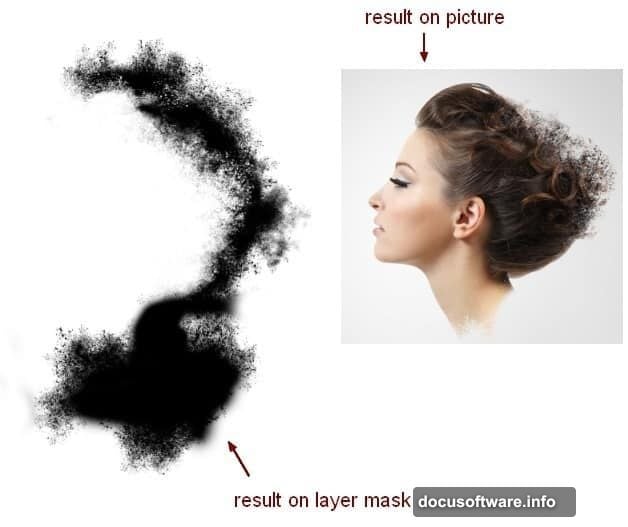
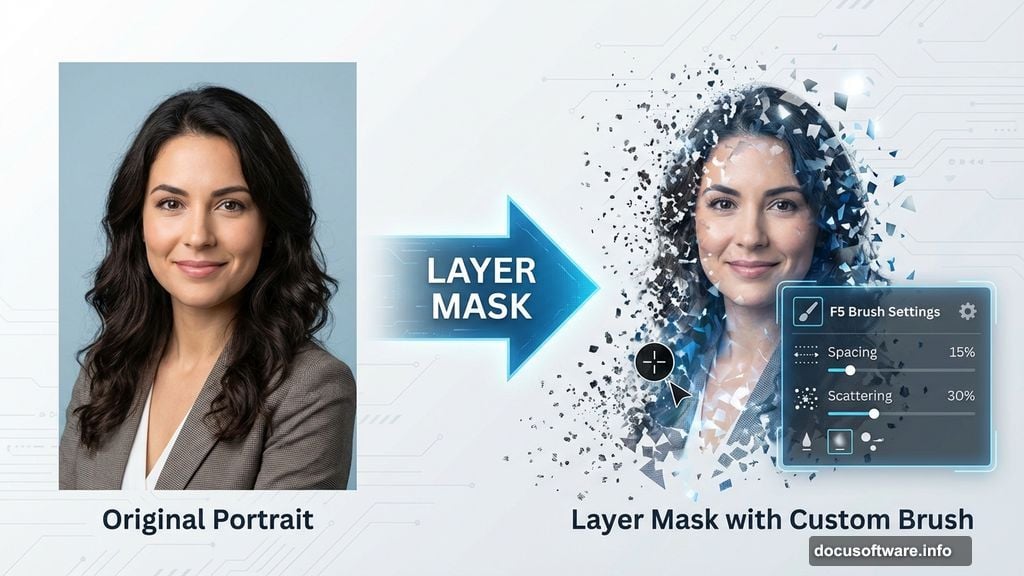
Add a layer mask to your model layer. First, use a soft black brush to gently soften hard edges around the hair, shoulder, and neck. Don’t overdo it—just enough to blend naturally.
Then switch to debris brushes for the magic part. Press F5 to open Brush Settings and adjust the spacing, scattering, and dynamics. Paint along those softened edges to create the disintegration look.
The key? Use different debris brushes and vary your pressure. This prevents the effect from looking repetitive or artificial. Each stroke should feel organic and chaotic.
Build Flowing Hair Movement
Copy the hair section from your original model stock. Place this new layer behind your main model layer on the canvas.
Go to Edit > Transform > Warp and bend the hair slightly. This creates movement and flow that draws the eye through your composition. The warped hair shouldn’t look perfectly symmetrical—asymmetry adds visual interest.
Add another layer mask with debris brushes. This continues the disintegration effect from the main portrait into the extended hair. The technique ties both elements together seamlessly.
Convert Everything To Black And White
Select both your model and hair layers. Press Cmd/Ctrl+G to group them together. Change the group blend mode from Pass Through to Normal at 100%.
Add a Gradient Map adjustment layer to the group. Choose the default black and white gradient. This instantly desaturates your model while maintaining rich tonal contrast.
Black and white conversion does more than remove color. It unifies disparate elements and creates that classic dark abstract aesthetic. Plus, it makes adding other elements easier since you’re not fighting color clashes.
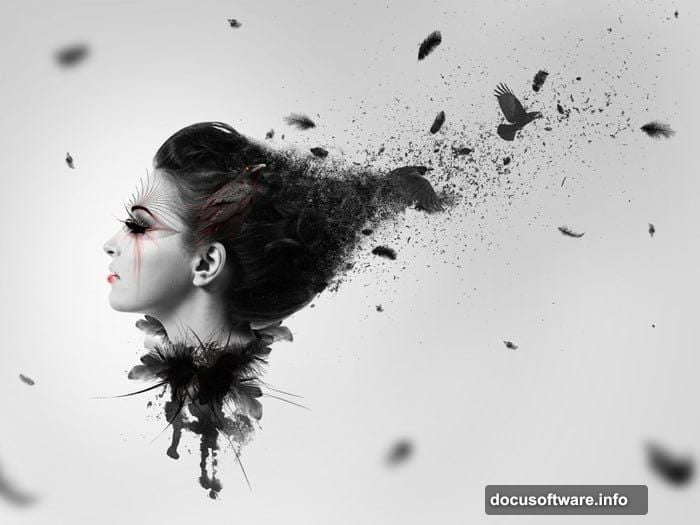
Add Abstract Elements And Crows
Now layer in your supporting elements: feathers, watercolor brushes, and crow images. Each addition should reinforce the disintegration theme and directional flow.
Place crows strategically to guide viewer attention. Position them flying away from or toward the disintegrating areas. This creates narrative tension—are the crows causing the disintegration or emerging from it?
Use the same masking techniques on these elements. Apply debris brushes to feather edges and crow silhouettes. Consistency in your disintegration effect across all layers creates visual cohesion.
Adjust the opacity of watercolor brushes between 30-60%. This adds texture without overwhelming your main subject. Layer different brushes at various opacities for depth.
Create Depth Of Field
Not every element should have the same sharpness. Use Gaussian Blur strategically to create depth.
Blur background debris more than foreground elements. This mimics how cameras naturally focus and makes your composition feel three-dimensional despite being flat artwork.
Apply subtle blur to some crows while keeping others sharp. This indicates distance and adds realism to your fantastical scene. The viewer’s brain reads blurred elements as farther away.
Draw Abstract Decorative Details
The final touch involves hand-drawn abstract elements. Use the Brush Tool or Pen Tool to add geometric shapes, spirals, or flowing lines around your model.
These decorative elements should complement the organic disintegration effect. Think of them as visual echoes that lead the eye through your composition. Place them where they balance negative space or emphasize movement.
Keep decorative elements minimal. Too many additions clutter the composition and dilute the impact of your main disintegration effect. Less is more when adding final flourishes.
Technical Settings That Matter
Throughout this process, specific settings make or break the effect. When using debris brushes, adjusting Spacing, Scattering, and Transfer in Brush Settings (F5) creates natural-looking disintegration.
Set Spacing around 25-50% depending on your brush. Increase Scattering for more chaotic dispersion. Enable Transfer and link it to pen pressure if you’re using a tablet. This adds organic variation to each stroke.
For layer masks, working with a soft brush at variable opacity (20-100%) gives you fine control. Start with lower opacity for subtle transitions. Build up to higher opacity where you need complete removal.
Save brush presets you create during this process. You’ll reuse successful settings for future projects and save significant time.
Why This Effect Works
The disintegration technique creates visual interest through contrast. Solid forms breaking into chaos catches the eye naturally. Your brain wants to resolve the tension between order and disorder.
Black and white conversion removes color as a distraction. Viewers focus on form, texture, and composition instead. This makes abstract elements easier to integrate seamlessly.
Crows add symbolic weight. They’re associated with mystery, transformation, and the liminal space between states. Even viewers who don’t consciously register the symbolism feel the emotional impact.
The combination creates artwork that feels both chaotic and controlled. Viewers sense the careful construction behind apparent randomness. That’s what makes the effect memorable.
Common Mistakes To Avoid
Don’t overuse the disintegration effect. Apply it strategically to areas where it enhances rather than obscures your subject. The model’s face should typically remain intact to maintain viewer connection.
Resist the temptation to add every available element. Crow photos, feathers, watercolor brushes, and debris can quickly become overwhelming. Choose elements that serve your composition.
Pay attention to light direction. If your model has light from the left, added elements should match that lighting. Inconsistent lighting breaks immersion immediately.
Test your work at different zoom levels. Details that look perfect at 100% zoom might disappear at normal viewing size. Focus on elements that read well at typical display dimensions.
This technique opens creative possibilities beyond dark portraits. The same principles work for fantasy scenes, album covers, or any project needing dramatic abstract elements. Master the fundamentals here and adapt them to your unique vision.