Turning portraits into dramatic abstract art doesn’t require years of experience. With the right brushes and a clear process, you can create stunning disintegration effects in an afternoon.
This technique combines portrait manipulation with abstract elements to build moody, eye-catching compositions. Plus, the step-by-step approach works for beginners and experienced designers alike. Let’s break down how to create this effect without getting lost in complicated steps.
Set Up Your Dark Canvas Foundation
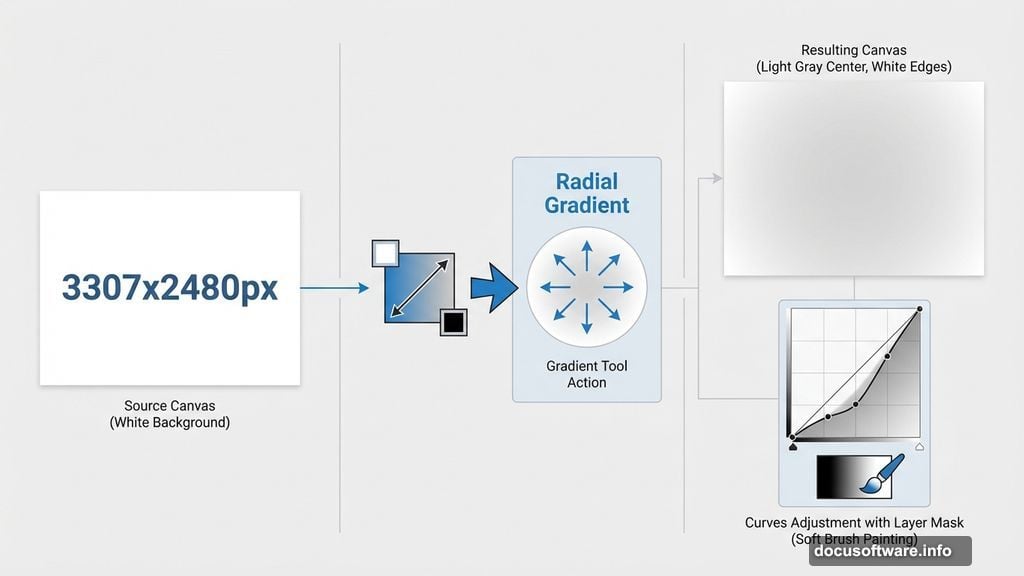
Start with a 3307×2480 pixel document. That size gives you plenty of resolution for print and web use.
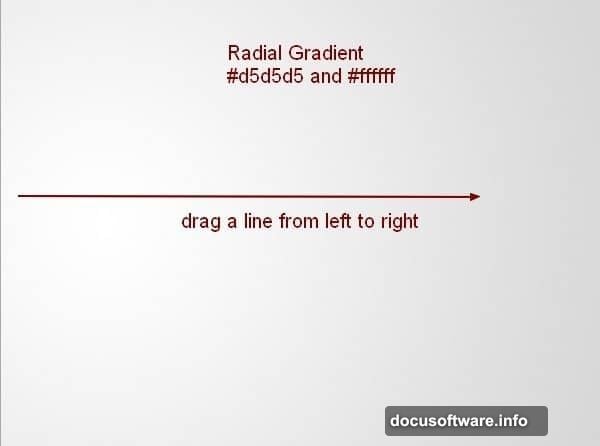
Fill the background with white first. Then create a new layer and grab the Gradient Tool. Choose Radial Gradient mode with light gray (#d5d5d5) in the center fading to white at the edges. Drag from left to right across your canvas.
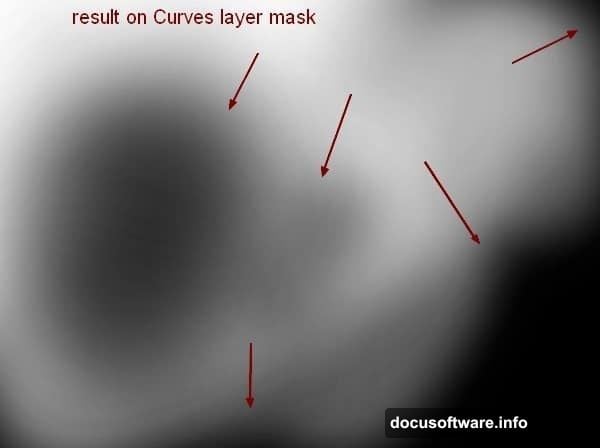
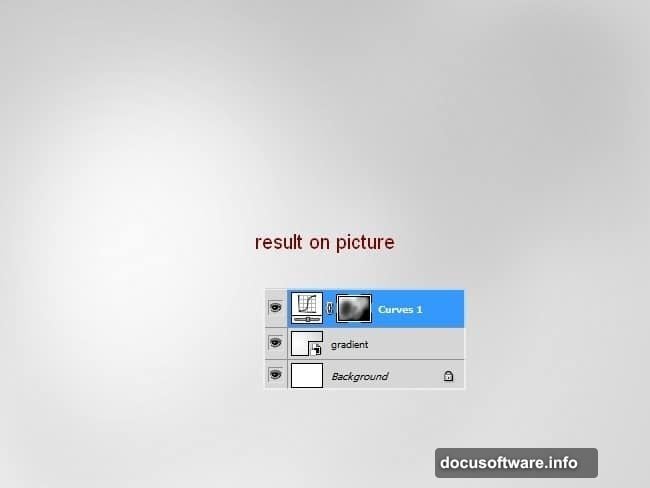
Next, add a Curves adjustment layer to darken the overall scene. Don’t worry if it looks too dark initially. You’ll paint back lighter areas on the Curves layer mask using a soft brush at varying opacity levels (20-100%). Focus on keeping some luminosity in the center where your subject will sit.
This foundation creates depth without overwhelming your composition. Dark edges naturally draw the eye toward your main subject.
Extract and Position Your Model Cleanly
Choose a portrait with good contrast and interesting hair. The hair matters because you’ll be creating dramatic effects there.
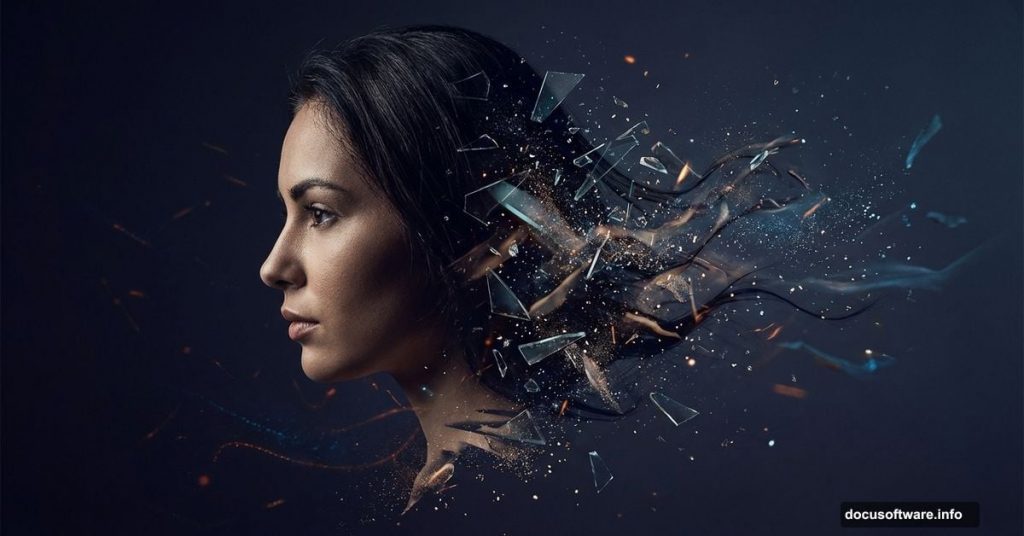
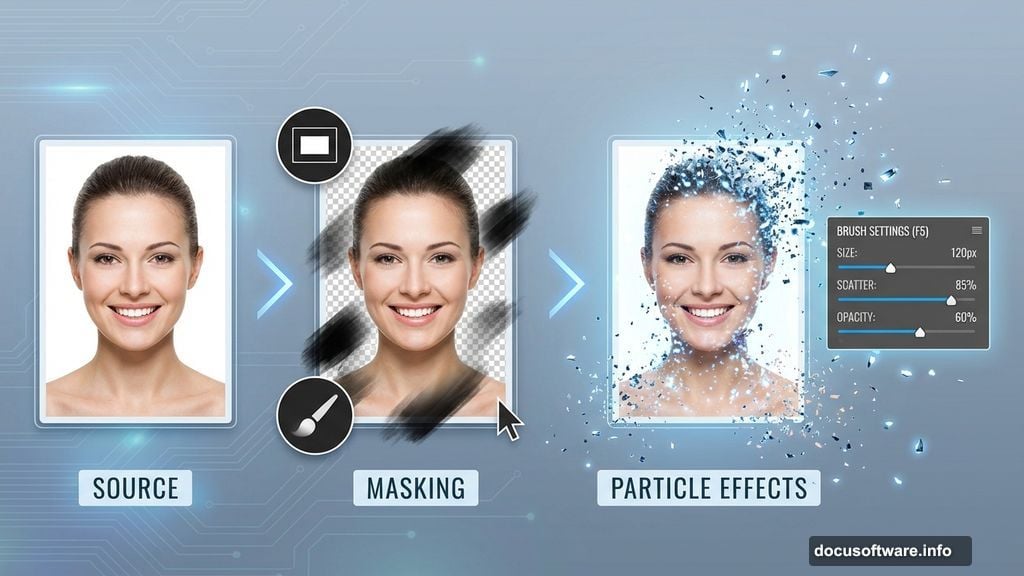
Extract your subject using your preferred selection method. Place the model on the left side of your canvas rather than dead center. Off-center placement feels more dynamic and leaves room for abstract elements.
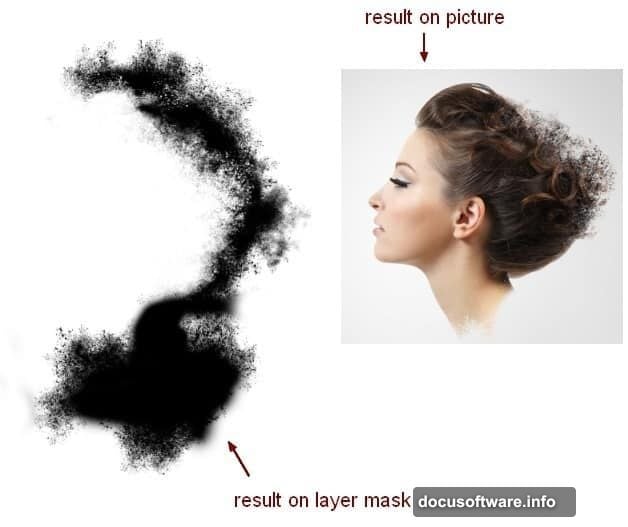
Now comes the signature technique: creating disintegration edges. Add a layer mask to your model layer. Use a soft black brush to gently soften hard edges around the hair, shoulders, and neck. Don’t overdo this step—just enough to make transitions feel natural.
Here’s where it gets interesting. Switch to debris brushes and paint along those masked edges. Adjust your brush settings (press F5) to vary size, scatter, and opacity. This creates the illusion that parts of your subject are fragmenting into particles.
The key is subtlety. Too much disintegration looks messy. Too little feels incomplete. Aim for a balance where the effect enhances drama without destroying recognizable features.
Build Dimensional Hair Elements
Go back to your original model image. Use the Lasso Tool to select interesting hair sections. Copy these pieces and place them behind your main model layer on the canvas.
Use Warp Tool (Edit > Transform > Warp) to bend and shape these hair elements. Think of them as flowing, organic shapes that add movement to your composition.
Add layer masks to these hair pieces using the same debris brush technique. This maintains consistency across all disintegrating elements. The scattered particles should feel like they belong to the same reality.
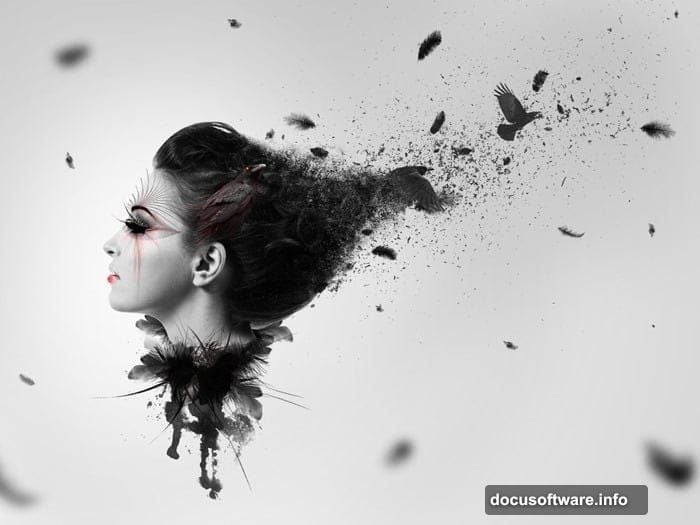
Group your model and hair layers together. Change the group blend mode from Pass Through to Normal at 100% opacity. Then add a Gradient Map adjustment layer set to black and white. This desaturates everything, creating that dramatic monochrome look.
Layer Abstract and Organic Elements
Bring in feathers at various angles around your subject. Some should appear sharp and focused, others slightly blurred. This variety creates depth of field that makes the composition feel three-dimensional.
Add watercolor brush strokes in strategic locations. These paint-like elements contrast nicely with the photographic aspects. Place them where they complement the composition flow without blocking important features.
Now for the dramatic touch: position crow images throughout your scene. Place some in sharp focus, others out of focus using Gaussian Blur. The crows add symbolic weight—they suggest transformation, mystery, or darkness depending on your interpretation.
More debris brushes scattered throughout tie everything together. Think of these particles as connecting elements that unify your subject with the abstract components.
Add Custom Decorative Details
This final layer separates good manipulations from great ones. Draw or place abstract geometric elements—spirals, circles, lines—that frame or accentuate your subject.
These decorations shouldn’t dominate. Instead, they guide the viewer’s eye through the composition. A spiral near the face? That draws attention. A circle framing the head? That creates emphasis.
Vary the opacity of these elements. Some should be bold, others barely visible. This layering creates visual richness that rewards closer inspection.
Finally, step back and assess your work. Does anything feel too heavy or distracting? Subtle adjustments to layer opacity and positioning make huge differences at this stage.
The Technical Details That Matter
Throughout this process, several technical choices significantly impact your results.
Brush settings determine everything. Press F5 to access detailed brush controls. Adjust scatter, size jitter, and opacity jitter to create natural-looking particle effects. Consistent settings across similar elements create visual coherence.
Layer masks preserve flexibility. You can always adjust effects later without destructive edits. This non-destructive workflow saves time when clients request changes.
Blend modes transform how layers interact. Experiment with Multiply, Screen, and Overlay modes on abstract elements. Sometimes a simple blend mode change creates the exact effect you’re seeking.
Resolution matters for final output. Starting with high-resolution source images (especially the model) prevents pixelation in your final composition.
Why This Technique Works for Various Projects
This dark abstract style fits multiple applications. Album covers, book designs, poster art, and social media graphics all benefit from this dramatic aesthetic.
The technique scales well too. You can create simpler versions by using fewer elements, or go complex with dozens of layered components. The core process remains the same.
Plus, once you master the basics, variations come naturally. Try different color schemes instead of black and white. Experiment with other animals besides crows. Replace debris brushes with smoke or light particles.
The real skill isn’t following steps perfectly. It’s understanding how layering, masking, and abstract elements combine to create visual impact. Master those principles, and you’ll develop your own signature style.
Practice this technique on multiple portraits. Each iteration teaches you something new about composition, balance, and dramatic effect. Before long, you’ll create these manipulations intuitively rather than following tutorials step-by-step.