Creating impossible worlds in Photoshop sounds intimidating. But this surreal “Inception” style tutorial breaks down every step.
You’ll learn abstract composition, layer blending, and digital manipulation techniques that transform ordinary photos into mind-bending artwork. Plus, the skills transfer to other creative projects beyond this tutorial.
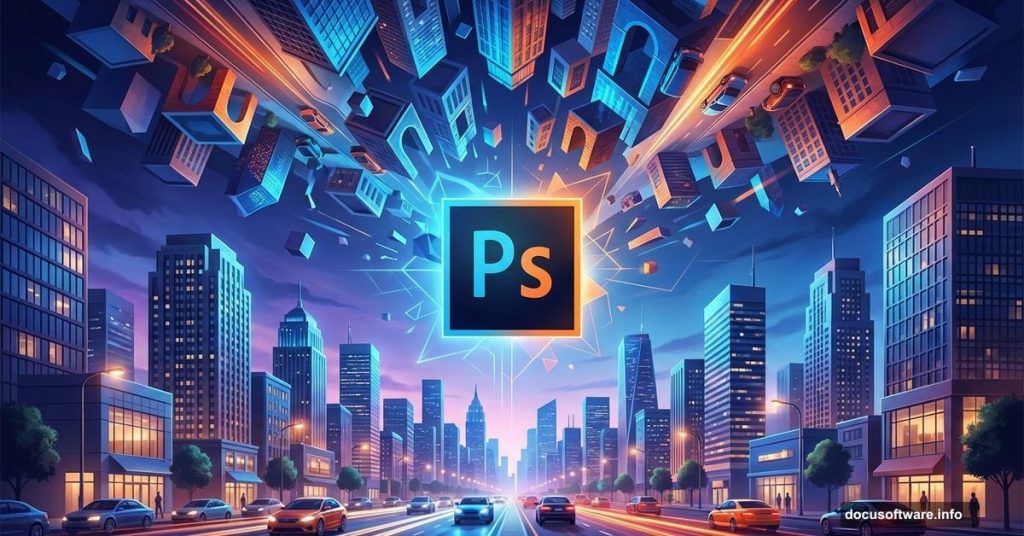
This guide walks through building a futuristic cityscape with floating elements and an urban model. Think Matrix meets modern architecture. The techniques work in any recent Photoshop version, from CS6 through current Creative Cloud releases.
What You’ll Actually Learn
This tutorial teaches practical Photoshop skills through hands-on creation. You’ll master color grading, selection tools, layer masks, and transformation effects. However, these aren’t just abstract exercises. Each technique solves real composition challenges.
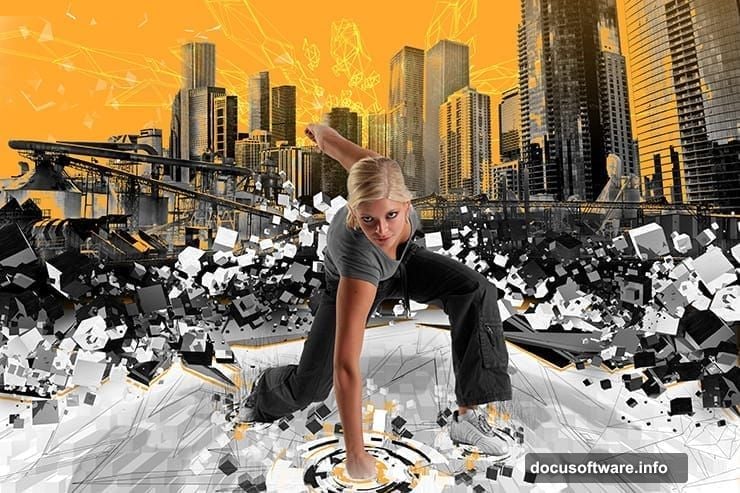
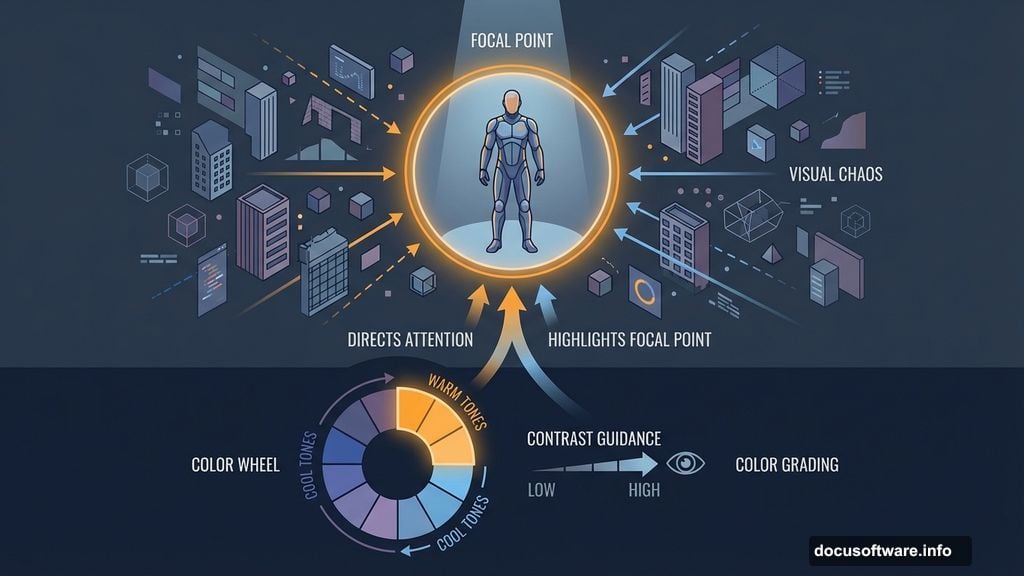
The project centers on a human subject surrounded by digital chaos. That forces you to balance focal points while maintaining visual flow. So you’ll practice directing viewer attention through contrast and placement.
Besides technical skills, you’ll develop creative vision. Surreal compositions require planning multiple elements that shouldn’t coexist. Yet making them feel cohesive demands intentional color choices and lighting consistency.
Gathering Your Resources
Before starting, download all image assets. You’ll need urban skyline photos, industrial building shots, abstract cube renders, and a model photograph. The tutorial recommends specific stock images from DeviantArt and stock sites.
Required downloads:
- High-rise building photos from Random-Acts-Stock
- Factory and industrial panoramas from EveLivesey
- 3D cube packs from TomSimo and Outof4mmo
- Action pose model image from comicReference
- High-tech Photoshop brushes from ardcor
Organization matters here. Create a dedicated project folder before downloading anything. Then sort resources by type: buildings, objects, models, brushes. This prevents frantic searching mid-tutorial when you need specific files.
Building Your Canvas Foundation
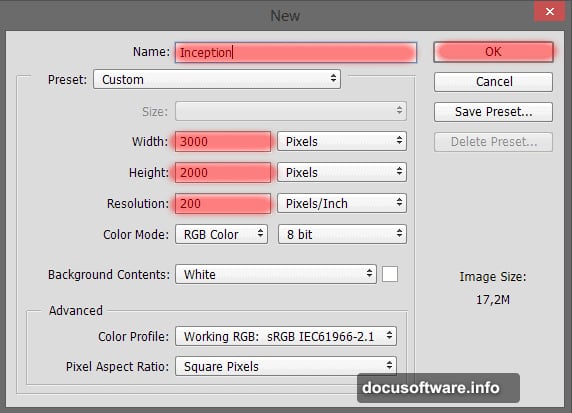
Start with proper document setup. Create a new file at 3000×2000 pixels with 200 DPI resolution. That size provides room for detailed work while maintaining print quality if needed.
Name your document immediately. “Inception” or whatever fits your vision. Plus, naming files properly saves confusion when juggling multiple projects.
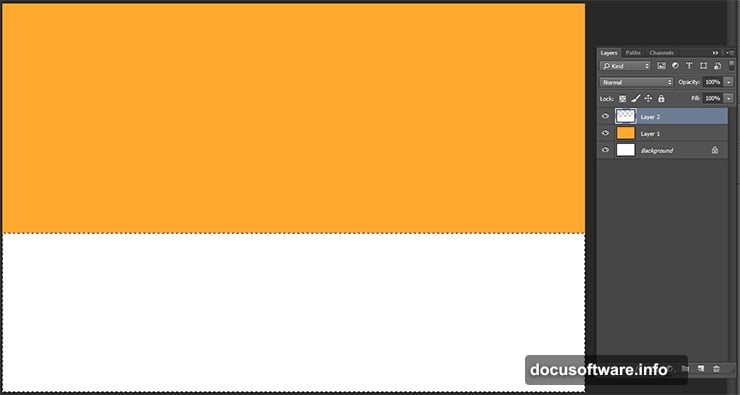
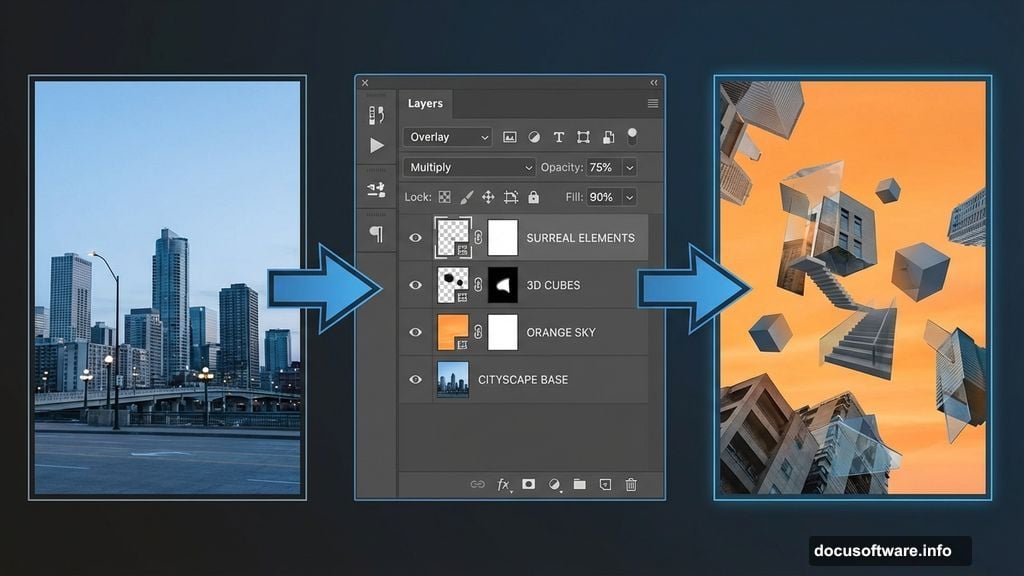
Fill your background with vibrant orange (#ffa92e). This creates instant visual energy and establishes the surreal tone. Moreover, warm backgrounds make cooler elements pop through color contrast.
Next, add a white rectangular section along the bottom. This grounds your composition and provides visual separation. Use the Rectangular Marquee Tool to select the lower portion, then fill with white. The clean division between orange and white establishes clear spatial zones.
Placing Your Central Subject
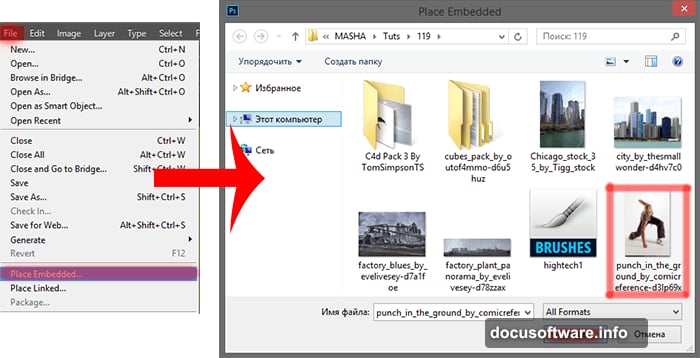
Import your model image using File > Place Embedded. This centers the human element immediately. Positioning your subject first prevents composition problems later.
Now comes crucial selection work. Use Quick Selection Tool to isolate the model from their background. Take your time here. Clean selections make or break photo manipulation quality.
Selection tips:
- Start with larger brush strokes for main body areas
- Switch to smaller brushes for detailed edges
- Reduce brush spacing to 1% for cleaner edges
- Use Pen Tool for difficult areas like shoes and fingers
If Quick Selection Tool struggles with sneakers or clothing details, switch to Pen Tool. Create a manual path around problem areas, then convert that path to a selection. This precision prevents fuzzy edges that scream amateur work.
Layer Masking Fundamentals
After selecting your model, add a layer mask. This non-destructive editing lets you refine edges without permanently deleting pixels. Click the Layer Mask icon at the bottom of your Layers panel.
Black conceals, white reveals. Paint with black on your mask to hide unwanted background areas. Paint with white to restore accidentally hidden sections. This flexibility beats using eraser tools that permanently destroy image data.
Feather your mask edges slightly. Hard edges between model and background look unnatural. A 1-2 pixel feather softens transitions while maintaining definition. Access this through Select > Modify > Feather.
Integrating Urban Elements
Import your skyscraper and building photos. These create the impossible architecture surrounding your subject. However, don’t just drop them in. Each building needs intentional placement and transformation.
Use Free Transform (Cmd/Ctrl + T) to resize, rotate, and perspective-warp buildings. This creates depth and visual interest. Moreover, slight distortions enhance the surreal quality rather than fight it.
Blend buildings using layer opacity and blend modes. Multiply mode darkens and integrates shadows. Screen mode brightens and creates ethereal effects. Overlay mode does both, depending on underlying colors. Experiment to find what enhances your composition.
Consider scale relationships carefully. Buildings that seem plausible individually might clash when combined. Adjust sizes until spatial relationships feel intentional rather than accidental.
Adding Abstract Cube Elements
Import your 3D cube renders. These floating geometric shapes amplify the digital world concept. But they require patience and multiple transformations to work effectively.
Position cubes at varying depths. Some near, some far. This creates spatial layers that draw eyes through the composition. Use size variation to reinforce depth perception.
Apply motion blur to some cubes. This suggests movement and energy within your static image. Go to Filter > Blur > Motion Blur. Adjust angle and distance to match your intended direction.
Duplicate cube layers and transform them differently. Rotation, scaling, and opacity changes create visual rhythm. However, avoid chaotic randomness. Group similar transformations to establish patterns viewers can follow.
Color Grading for Cohesion

Your disparate elements need unified color treatment. Otherwise, they’ll feel pasted together rather than inhabiting one world. Color grading fixes this.
Add Adjustment Layers above your main elements. Curves adjustments offer precise control over highlights, midtones, and shadows. Push blues cooler, push oranges warmer. This exaggerates the color scheme you established with your orange background.
Use Color Balance adjustments for broader shifts. Add cyan to shadows, yellow to highlights. These subtle color casts tie elements together through consistent tinting.
Hue/Saturation adjustments let you target specific colors. Maybe your buildings need desaturated greens to match the model’s clothing. Or perhaps you want to push magentas into blues for a cooler digital feel.
Building Atmospheric Effects
Add fog or haze using soft brushes with low opacity. White or light gray at 10-15% opacity creates depth through atmospheric perspective. Paint on new layers above your background elements but below your foreground subject.
This technique mimics how distant objects appear hazier in real photography. So it tricks eyes into perceiving depth in your flat composite.
Consider adding light rays. Create a new layer, use a soft white brush along diagonal lines, then set the layer to Screen mode. This suggests environmental lighting and adds drama.
Particle effects using custom brushes enhance the digital aesthetic. Your downloaded high-tech brushes work perfectly here. Scatter small bright particles around cube elements. This reinforces the digital world concept.
Final Lighting Integration
Consistent lighting sells impossible scenes. Your model has specific light direction. Your buildings have different lighting. Harmonizing these requires intentional shadow and highlight work.
Create shadow layers beneath and around your model. Use soft black brushes at low opacity. Paint shadows where your model would block environmental light. This grounds floating subjects.
Add rim lighting to separate subjects from backgrounds. Create a new layer above your model, set to Screen mode. Paint subtle white or warm highlights along edges catching light. This creates definition without harsh outlines.
Dodge and Burn tools refine existing lighting. Dodge brightens, Burn darkens. Use these to emphasize light direction across all elements. Consistent light behavior makes disparate elements feel like they share physical space.
Sharpening and Detail Enhancement
Before finishing, sharpen selectively. Your focal points need crispness while backgrounds can stay softer. This guides viewer attention.
Use Unsharp Mask filter on your model layer. Set Amount around 80-120%, Radius 1-2 pixels, Threshold 0-4 levels. This enhances edge definition without creating halos.
Avoid sharpening entire compositions. That flattens depth by making everything equally sharp. Instead, maintain focus hierarchy through selective sharpening.
Add final detail using High Pass sharpening. Duplicate your merged composition, go to Filter > Other > High Pass. Set Radius around 3-5 pixels. Change layer mode to Overlay or Soft Light. Adjust opacity to taste.
Why This Tutorial Matters
Photo manipulation teaches transferable skills beyond surreal artwork. Selection techniques work for any composite photography. Color grading applies to portrait retouching. Layer blending improves graphic design work.
Moreover, tackling complex multi-element compositions builds creative problem-solving. You learn to break overwhelming projects into manageable steps. That mindset applies everywhere Photoshop appears in your workflow.
This Inception-style piece demonstrates how imagination plus technical skill creates impossible realities. The same principles power movie effects, advertising campaigns, and fine art photography.
Building surreal worlds in Photoshop isn’t about copying tutorials exactly. It’s about understanding techniques deeply enough to apply them to your own creative visions. Master these skills, then make something nobody’s seen before.