Walk-by transitions look slick. They feel cinematic. Plus, you can shoot them purely in-camera or enhance them with simple Premiere Pro masking.
This technique works great for product showcases, travel videos, or any project where you want smooth scene transitions. The best part? You don’t need expensive plugins. Just a camera, some planning, and basic Premiere Pro skills.
Let me show you how to nail this effect.
Shooting the Perfect Walk-By Footage
The foundation happens before you touch Premiere. You need footage where something passes completely in front of your lens. That could be a person walking by, a wall sliding past, or any object that blocks the frame entirely.
Here’s what matters during the shoot. Move your camera smoothly past an object until the frame goes completely black or is fully blocked. That moment of total darkness becomes your transition point.
A camera slider helps immensely. It keeps movement smooth and predictable. But handheld works too if you can keep it steady. The key is getting that full-frame blockage where nothing from your original scene remains visible.
Shoot in 4K if your camera allows it. Higher resolution gives you more flexibility when cropping and adjusting in post. Plus, modern laptops handle 4K editing better than you might expect.
Setting Up Your Timeline
Import both clips into Premiere Pro. These are your before and after scenes that you’ll connect with the walk-by transition.
Trim both clips to the exact frame where everything goes black. Play through each clip and find that perfect moment of complete darkness. Mark it. This frame is your anchor point for the entire transition.
Now here’s a helpful trick. Drop a bright green matte color layer underneath your video tracks. Set it to extend across your entire timeline. This acts as a visual guide. Whenever you see green peeking through, you know you’ve got transparency that needs addressing.
The green layer isn’t part of your final video. It just helps you spot problems while you work.
Creating the Mask Transition
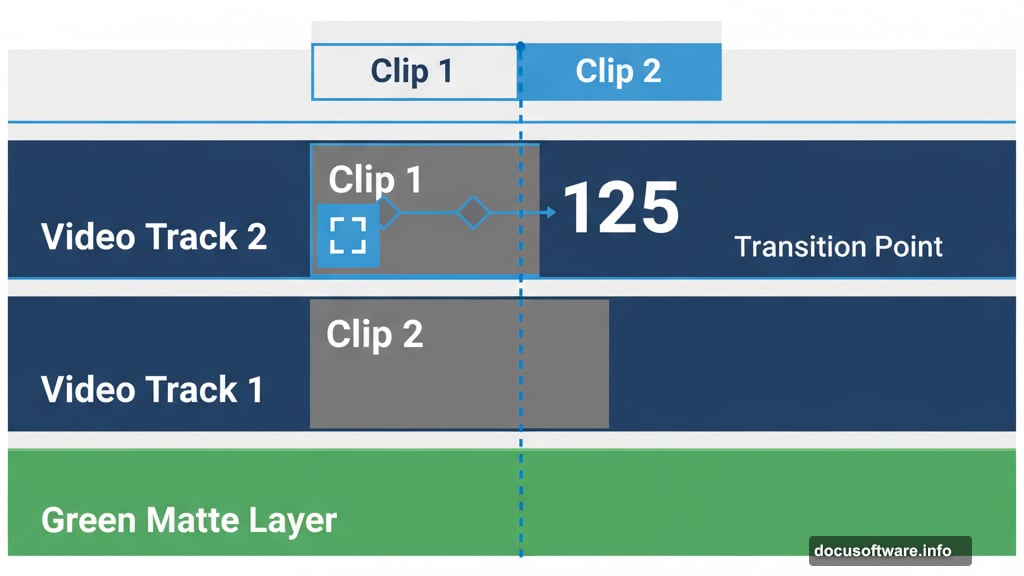
Place your first clip on Video Track 2. This is the scene you’re leaving. Find the exact frame where your blocking object enters the frame. Mark this spot with an in-point.

Now apply a Crop effect to this clip. Set the feather to 125 for smooth edges. This high feather value prevents harsh lines in your transition.
Create a keyframe at the marked in-point with zero cropping. Move your playhead forward to where the blocking object completely exits the frame. Set another keyframe here with full cropping applied. Premiere will animate between these two states automatically.
Drop your second clip on Video Track 1 underneath. This is your destination scene. Slide it along the timeline until it lines up perfectly with where your first clip’s transition completes.
Preview the result. You should see a smooth wipe from one scene to the next as your blocking object moves across frame. The green matte shows through only where you want transparency.
Enhancing with Speed Ramping
Basic transition working? Great. Now make it feel even more dynamic with speed ramping.
Select both clips and your transition. Right-click and choose “Nest.” This combines everything into a single sequence within your timeline. Name it something like “Walk-By Transition 01.”
Right-click the nested sequence and select “Speed/Duration.” Or use the Rate Stretch tool to adjust playback speed visually on your timeline. Speed up the actual transition moment slightly. This creates a more energetic feeling.
Here’s the advanced touch. Apply a small amount of directional blur to the sped-up section. Match the blur direction to your camera movement. This simulates natural motion blur and makes the speed change feel more organic.
Also try adding a slight frame stretch or echo effect during the fastest part. This creates a stylized look that many cinematic videos use. Keep it subtle though. Too much looks artificial.
Color Grading the Final Result
Once your transition mechanics work perfectly, polish the look with Lumetri Color. Open the Lumetri Color panel and apply adjustments to your nested sequence.
Match the color grade between both scenes. Nothing ruins a smooth transition faster than drastically different color temperatures or exposure levels between clips.
Use adjustment layers if you need different grades for each scene. Stack them properly so your transition remains smooth while individual scenes maintain their unique looks.
Modern laptops handle this workflow surprisingly well. Even with 4K footage, multiple adjustment layers, and real-time effects, performance stays smooth if you’re using a decent editing machine.
Exporting Your Transition
Ready to export? Use H.264 format for most web and social media destinations. Set your bitrate to match your source footage quality. For 4K content, aim for 50-100 Mbps depending on your detail requirements.
Hardware acceleration speeds up exports dramatically. Enable it in Premiere’s preferences if your system supports it. What might take 10 minutes without acceleration often completes in 2-3 minutes with it enabled.
Watch your export complete. Even complex timelines with multiple effects and 4K footage export faster than you’d expect on modern hardware.
When This Transition Works Best
Walk-by transitions shine in specific scenarios. Product showcases benefit hugely. Move from wide shot to close-up with natural feeling motion. Travel videos use them to jump between locations smoothly.
They’re also perfect for before-and-after reveals. Block the frame, swap the scene, and reveal the transformation. Much more interesting than a simple cut or dissolve.
However, don’t overuse them. Like any flashy transition, they lose impact if you deploy them constantly. Save them for moments that deserve emphasis. Key scene changes. Important reveals. Climactic moments.
Common Mistakes to Avoid
The biggest error? Mismatched camera movement speed between clips. If your first clip pans left slowly but your second clip’s blocking object moves right quickly, the transition feels jarring. Keep movement speed consistent.
Another issue is insufficient feathering on your crop effect. Low feather values create hard edges that scream “artificial.” Always use high feather settings for smooth, natural-looking transitions.
Also watch your audio. Don’t let it cut abruptly at the transition point. Crossfade your audio tracks so the sound transition feels as smooth as the visual one. Jarring audio ruins even the best visual transitions.
Finally, remember that green matte layer. Delete it before exporting. Sounds obvious, but it’s easy to forget after hours of editing. Always do a final timeline review before hitting export.
This transition takes practice. Your first few attempts might feel clunky. But master the technique and you’ll have a professional-looking effect that elevates any video project.