Wait, let me start over with a better approach.
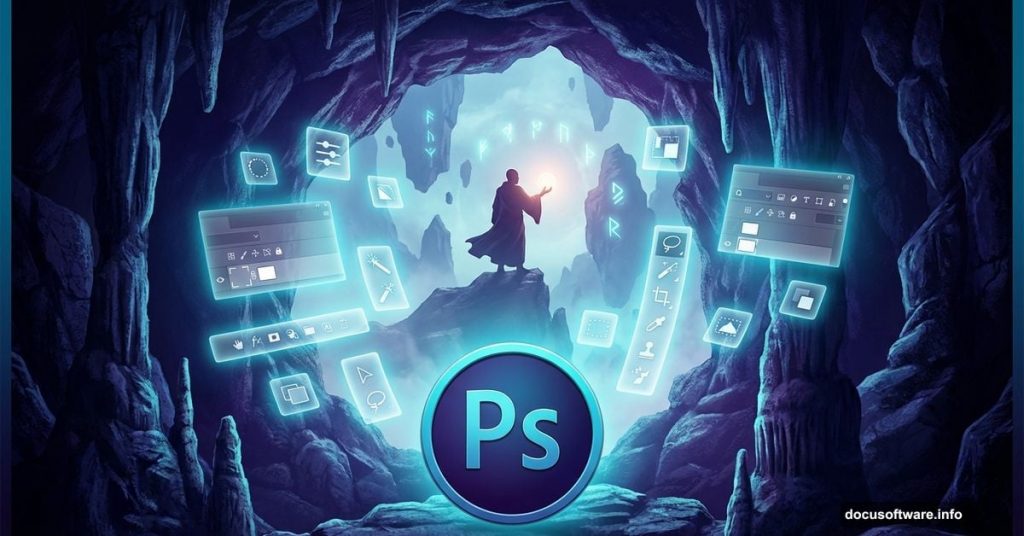
Creating surreal photo manipulations sounds intimidating. But break it down into manageable pieces, and suddenly it’s doable.
This tutorial walks through building a haunting cave scene featuring a monk and floating sphere. You’ll learn how to merge rock textures into believable caves, create rope cubes using 3D references, and craft dramatic mountain scenes rising through clouds.
The techniques here apply far beyond this specific project. Master these methods, and you’ll handle most photo manipulation challenges with confidence.
What You’ll Actually Learn
This isn’t just about following steps blindly. You’ll pick up practical skills that transfer to other projects.
Core techniques covered:
- Transforming and merging rock textures into cohesive cave structures
- Using 3D cube references to create realistic rope formations
- Building convincing mountain scenes above cloud layers
- Working with layer masks to blend elements seamlessly
- Adjusting lighting across multiple merged layers
Plus, you’ll get comfortable with non-destructive editing workflows. That means you can revise your work later without starting over.

Gathering Your Resources
Before diving in, collect all the stock images you’ll need. The tutorial requires mountains, fields, skies, rope textures, monk photos, planet images, and various texture overlays.
Most resources come from stock photo sites like Sxc and DeviantArt. The monk image comes from Public Domain Pictures, so no licensing headaches there.
Download everything first. Trust me. Nothing kills creative momentum like hunting for a missing stock photo halfway through.
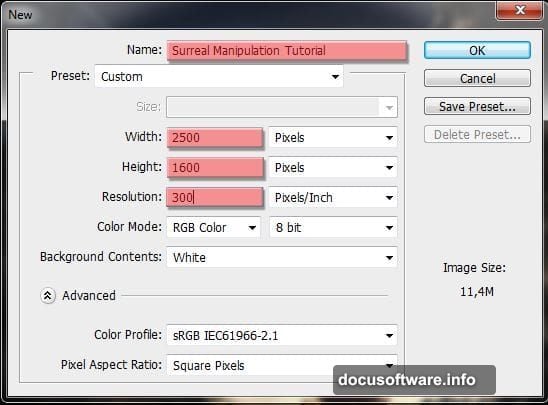
Setting Up Your Canvas
Start by creating a new Photoshop file. The tutorial recommends specific dimensions to ensure everything fits properly.
Name your file something memorable. “Surreal Manipulation Tutorial” works fine. But “Cave Project” or whatever makes sense to you works too.
Here’s the thing about canvas setup. Get it right at the start, and you’ll avoid scaling headaches later. So take an extra minute to match the recommended dimensions exactly.
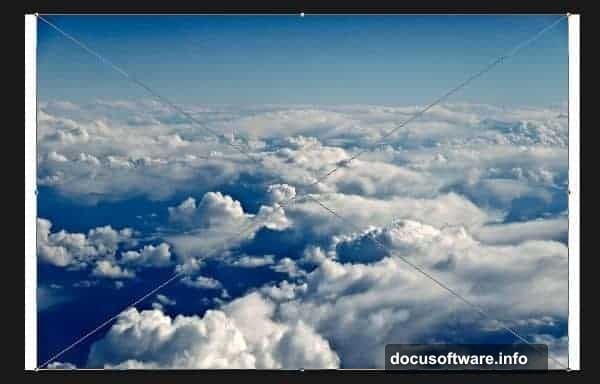
Building the Foundation: Sky and Clouds
First, place your sky images. Photoshop’s Place command (File → Place) lets you position images without committing immediately.
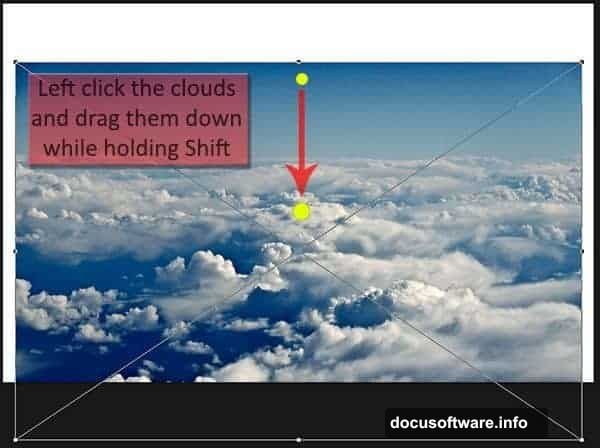
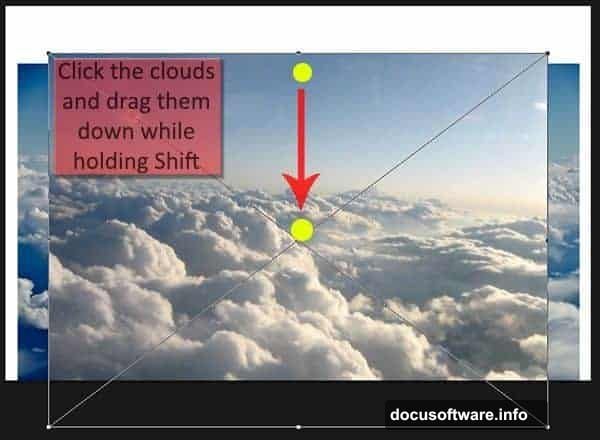
Layer your clouds strategically. The tutorial uses two cloud images at different heights. This creates depth right from the start.
Hold Shift while dragging to maintain aspect ratios. Otherwise, your clouds might stretch weirdly. Nobody wants weird clouds.
Add the field image next, but place it behind your cloud layers. This establishes the ground plane for your scene.
Layer Organization Matters
Before going further, rename your layers. Seriously.
“Layer 1” and “Layer 2” make sense now. But wait until you’re 30 layers deep, trying to remember which one contains the left cave wall.
Double-click any layer name to rename it. Use clear, descriptive names like “Cloud Base” or “Field Ground” instead of defaults.
This small habit saves massive frustration later. Plus, it makes the tutorial easier to follow when your layer names match the instructions.
Blending Clouds and Sky
Now comes the fun part. Create layer masks to blend your clouds smoothly.
Click the layer mask button (looks like a camera icon) on the Clouds 2 layer. This adds a mask without destroying pixel data.
Paint with black on the mask to hide parts of the cloud layer. Paint with white to reveal them again. Gray values create partial transparency.
The beauty of masks? You never permanently delete anything. Change your mind later? Just repaint the mask. No harm done.
Constructing the Cave Structure
This is where the tutorial gets detailed. You’ll merge multiple rock images to create cave walls, ceiling, and floor.
The process involves:
- Placing rock stock photos
- Using Transform tools to reshape them
- Applying layer masks to blend edges
- Adjusting colors to match lighting
Take your time here. The cave forms the foundation for everything else. Rush it, and the final image suffers.
Position each rock piece, then mask its edges so they blend seamlessly with adjacent rocks. The goal? Making separate stock photos look like one continuous cave surface.
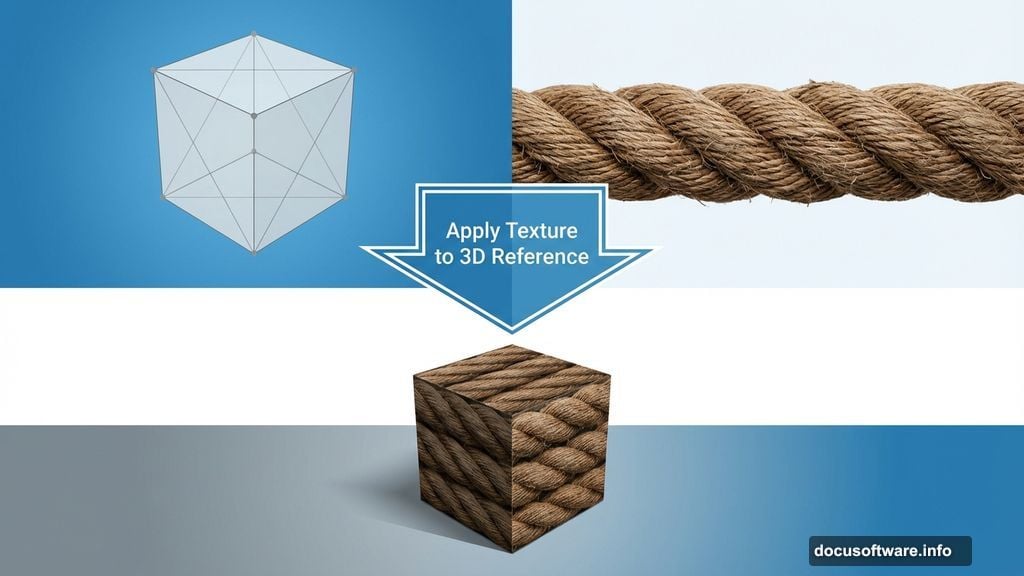
Creating Realistic Rope Geometry
Here’s a clever shortcut. Instead of drawing ropes manually, use a 3D cube image as a reference.
Place the cube reference on a new layer. Lower its opacity so you can see through it. Then trace rope segments along the cube’s edges.
This technique guarantees perfect perspective. Your rope cube looks three-dimensional because it follows actual 3D geometry.
Remove the reference cube when finished. What remains? Ropes that look convincingly real because they follow proper spatial logic.
Adding the Floating Sphere
The sphere provides a focal point. Place it carefully within your rope cube structure.
Adjust lighting on the sphere to match your cave lighting. This sells the illusion that sphere and cave exist in the same space.
Use layer styles (like Inner Glow or Outer Glow) to make the sphere emit light. This creates visual interest and explains the scene’s lighting.
Don’t overdo it though. Subtle glow looks mysterious. Excessive glow looks like a lens flare mistake from 2003.
Placing the Monk
Your monk photo needs careful integration. The figure must feel part of the scene, not pasted on top.
Match the lighting direction. If light hits the cave from the right, it should hit the monk from the right too.
Add shadows beneath the monk. Nothing screams “fake” like a figure floating above the ground with no shadow.
Adjust color balance to match the cave’s color temperature. If the cave looks warm and orange, cool blue monk lighting won’t work.
Building the Mountain Background
Above your caves, create a mountain range peeking through clouds. This adds depth and scale to your composition.
Place mountain stock photos, then use layer masks to blend them with your cloud layers. The goal? Mountains that appear to rise naturally from the cloud bank.
Adjust color and contrast on the mountains. Atmospheric perspective means distant objects look hazier and less saturated than near objects.
So your mountains should feel softer and bluer than your foreground cave. This depth cue helps viewers understand spatial relationships.
Lighting the Scene
Consistent lighting sells the illusion. Create new adjustment layers for shadows and highlights across your scene.
Use Curves or Levels adjustments with layer masks to darken shadow areas. Then add subtle highlights where light would naturally hit surfaces.
The tutorial recommends grouping your cave layers, then adding a lighting adjustment layer above them. This applies lighting changes to all cave elements at once.
Smart, right? One adjustment layer beats manually adjusting ten individual layers.
Final Texture Overlays
Nearly done. Add texture overlays to increase visual richness and tie elements together.
Place texture images (like grunge or dust textures) over your scene. Set their blend modes to Overlay or Soft Light. Adjust opacity until they add interest without overwhelming the image.
These textures create visual cohesion. They help separate elements feel like they belong in the same photograph.
Color Grading for Mood
Your final step involves color grading the entire image. This establishes mood and makes everything feel unified.
Add a Color Lookup adjustment layer or use Curves to push colors toward a specific palette. Warm oranges and cool blues create nice contrast.
Be subtle. Heavy-handed color grading looks amateur. The goal? Enhancing mood without distracting from your composition.
Common Mistakes to Avoid
Ignoring light direction. Every element must share the same lighting logic. Mix different light directions, and your scene falls apart.
Skipping layer masks. Deleting pixels directly means you can’t fix mistakes later. Always use masks for non-destructive editing.
Rushing the blending. Visible seams between merged elements destroy immersion. Spend extra time perfecting your masks.
Forgetting atmospheric perspective. Distant objects need less contrast and saturation. This depth cue makes or breaks spatial believability.
Over-processing. Knowing when to stop separates good manipulations from overdone messes. If you’re questioning whether to add another effect, you’re probably done.
Why This Tutorial Works
Most Photoshop tutorials skip the why behind techniques. This one explains the reasoning, making skills transferable to other projects.
You’re not just following steps blindly. You’re learning principles like how to blend textures, create depth, and maintain consistent lighting.
Master these fundamentals, and you’ll tackle any photo manipulation with confidence. The specific scene (monk in cave) matters less than the techniques you’ve learned.
Plus, the tutorial uses freely available stock images. No expensive subscriptions required. That accessibility matters for beginners building skills.
Taking It Further
Once you’ve completed this tutorial, experiment with variations. Change the color grading. Swap different stock photos. Add your own creative elements.
The best learning happens when you adapt techniques to your own projects. Don’t just copy this tutorial exactly. Use it as a springboard for your own surreal creations.
Every professional started somewhere. This tutorial provides solid fundamentals. Where you take those skills? That’s up to you.