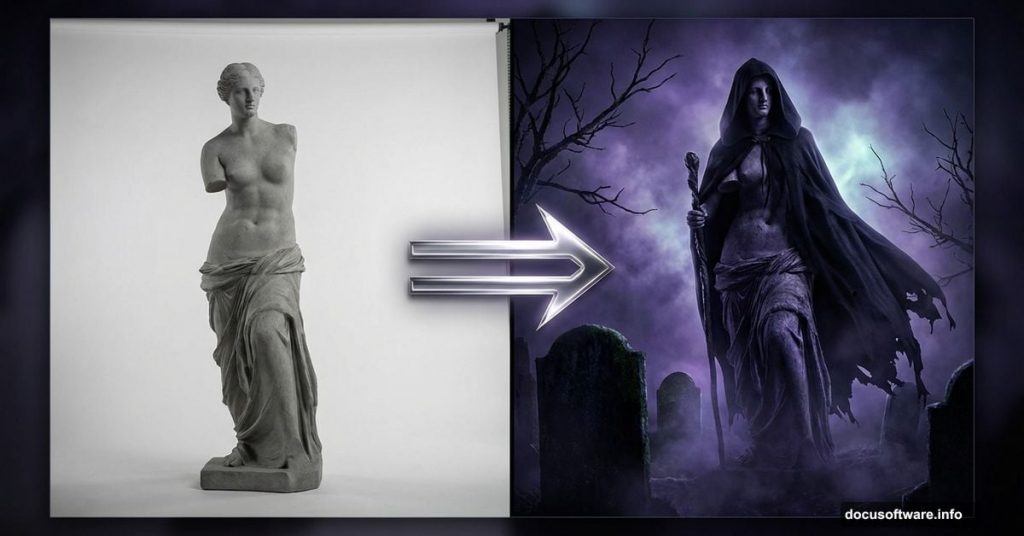
Want to create haunting photo manipulations that look professionally eerie? This tutorial shows you exactly how to build a dark queen scene in a cemetery from scratch.
You’ll take a simple statue photo and transform it into something genuinely spooky. Plus, we’ll combine multiple elements like tombs, smoke, and skeletal hands to build the complete atmosphere.
This isn’t a quick five-minute effect. But the techniques you’ll learn work for any dark fantasy manipulation you want to create later.
What You’ll Actually Learn
This tutorial focuses on practical Photoshop skills you can reuse:
Core techniques covered:
- Dodge and burn for dimensional shading
- Layer masking for seamless blending
- Smudging for organic textures
- Color adjustments for mood control
- Light painting for atmosphere
You’ll need Photoshop CS3 or newer. The techniques work in any recent version, including Creative Cloud.
Grab your favorite beverage. This tutorial takes time but delivers results worth the effort.
Gathering Your Image Assets
Before touching Photoshop, download these stock images:
Required elements:
- Stone statue (your main figure)
- Cemetery background with tombstones
- Smoke textures for atmosphere
- Nebula images for sky drama
- Hooded cloak reference
- Candles for lighting accents
- Skeletal arms and bones
- Fabric textures for cloth details
Most of these come from free stock sites like Freeimages, Pixabay, and DeviantART. The tutorial links to specific images that work well together.
Having all assets ready saves frustration mid-project. Trust me on this.
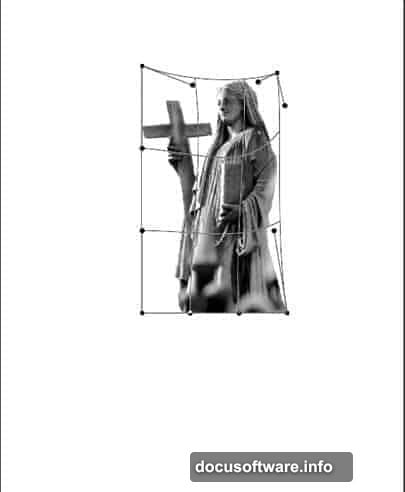
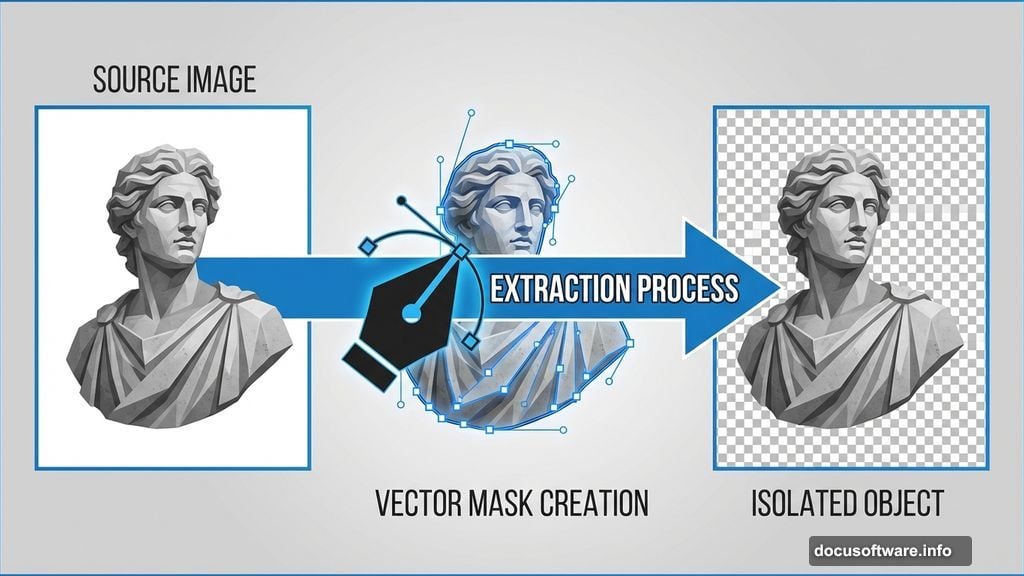
Extracting the Statue Figure
First, open your statue image in Photoshop. We need to separate it from its background completely.
Use the Pen Tool for clean edges. Yes, it takes patience. But the result looks professional instead of sloppy.
Quick extraction tips:
- Zoom in close for detailed areas
- Create anchor points at major direction changes
- Keep curves smooth for organic edges
- Convert your path to a selection when done
Once extracted, you’ll have a statue on a transparent background. Save this as a separate file so you can reuse it later if needed.
The cleaner your extraction, the better your final composite looks. Don’t rush this step.
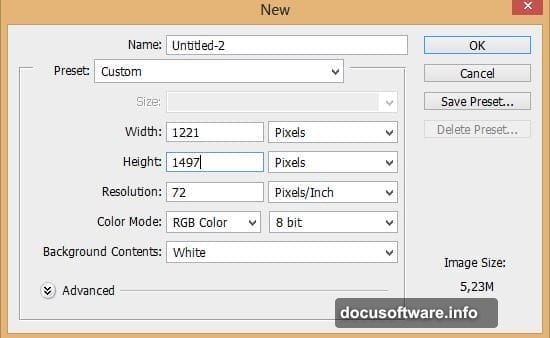
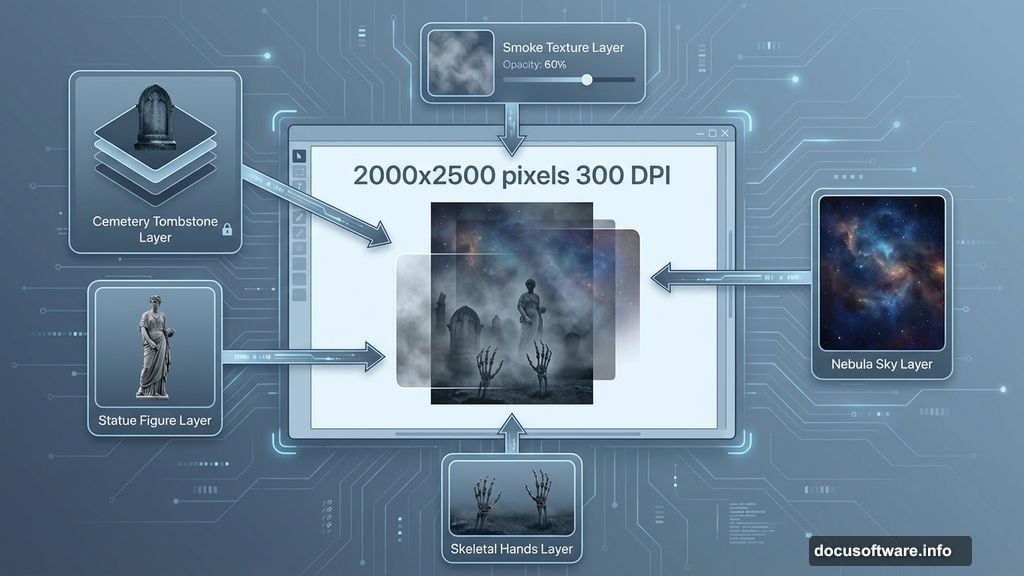
Building Your Canvas
Now create a new document for your dark queen scene. Hit Ctrl+N to open the new document dialog.
Recommended canvas size:
- Width: 2000 pixels
- Height: 2500 pixels
- Resolution: 300 DPI for print quality
- Color Mode: RGB
These dimensions give you room to work without feeling cramped. You can always resize later for specific uses.
Place your extracted statue in this new document. It probably looks too stiff and statue-like still. We’ll fix that next.
Warping the Figure Shape
Press Ctrl+T to activate Free Transform. But don’t just scale it. Right-click and choose Warp.
This tool lets you push and pull the statue into a more dynamic pose. Make subtle adjustments:
Warping suggestions:
- Elongate the torso slightly for elegance
- Adjust shoulder angles for drama
- Curve the overall posture
- Keep changes believable
Too much warping looks fake. Small tweaks create big atmospheric changes without breaking realism.
Masking the Lower Body
We want the queen to appear emerging from shadows. So her lower body should fade into darkness.
Click the Layer Mask icon at the bottom of the Layers panel. This adds a white mask thumbnail next to your layer.
Select a soft black brush. Paint on the mask to hide the statue’s lower portion gradually. The effect should feel organic, not like you just erased it with a hard edge.
Masking technique:
- Use a large, soft brush
- Lower opacity to 30-40%
- Build up darkness gradually
- Fade from solid to transparent
The white mask thumbnail shows where you’ve painted. Black areas hide pixels, white reveals them, gray creates transparency.
This foundational masking technique appears throughout photo manipulation work. Master it now.
Adding the Cemetery Background
Open your cemetery image. Drag it into your working document as a new layer.
Position it below your statue layer. This becomes your environmental foundation.
The cemetery probably won’t match your statue’s lighting immediately. Don’t worry. We’ll fix color and lighting mismatches in later steps through adjustment layers.
Background placement tips:
- Consider composition balance
- Leave room for additional elements
- Think about where light sources should be
- Check if ground level aligns logically
Sometimes you’ll need multiple background images blended together. Start with your primary environment first, then add supplementary elements.
Building Atmospheric Depth
Dark fantasy scenes need atmospheric depth. Flat lighting kills the mood instantly.
Add your nebula images as new layers above the background but below your main figure. Set these layers to Screen or Lighten blend mode.
Lower the opacity until they create subtle color variation in the sky without overwhelming the scene. Think 20-30% opacity usually works.
Creating depth layers:
- Distant elements get more atmosphere
- Closer elements stay sharper
- Use layer masks to fade effects naturally
- Build up multiple subtle layers
Real atmosphere comes from stacking multiple subtle effects. One dramatic layer looks fake.
Dodge and Burn for Dimension
Here’s where your statue transforms from flat to dimensional. Create a new layer above your statue. Set it to Overlay blend mode.
Select the Dodge Tool. Set it to Highlights, 10-15% exposure. Paint over areas where light would naturally hit: shoulders, chest, facial features.
Now switch to the Burn Tool. Same settings but paint shadows into recessed areas: under the chin, in folds, alongside the body.
Dodge and burn strategy:
- Build up gradually with low exposure
- Follow the existing form
- Think about your light source direction
- Don’t overdo it
This technique mimics traditional photography darkroom work. It’s how you create genuine dimensionality in flat images.
Work slowly. You can always add more. Removing excess is harder.
Adding the Hooded Cloak
Your dark queen needs dramatic costume elements. Open the hooded cloak reference image.
Extract just the hood portion you need. Place it as a new layer, positioning it over the statue’s head and shoulders.
Use Free Transform and Warp to make the hood conform to the underlying form. This takes patience and artistic judgment.
Cloak integration:
- Match lighting direction
- Use layer masks for soft edges
- Add shadows where fabric overlaps
- Paint highlights on raised folds
The cloak should feel like part of the figure, not pasted on top. Blend edges carefully with a soft eraser or layer mask.
Incorporating Skeletal Elements
Dark queens need macabre details. Add skeletal hands, bones, or skulls to enhance the eerie atmosphere.
Extract these elements from your stock images. Position them logically in the scene: maybe reaching from the ground, held by the queen, or scattered around tombstones.
Skeleton placement considerations:
- Match lighting to environment
- Add shadows beneath bones
- Use desaturation to age them
- Consider composition flow
These elements draw the eye and reinforce your dark fantasy theme. But don’t overdo it. Too many skulls becomes comical instead of eerie.
Painting Smoke and Fog
Atmosphere isn’t just about color. Actual smoke and fog add crucial depth.
Place your smoke stock images as new layers. Set them to Screen blend mode so black disappears and only the smoke shows.
Use layer masks to fade smoke edges naturally. Paint with a soft brush to create wispy, organic transitions.
Smoke techniques:
- Multiple thin layers work better than one thick layer
- Vary opacity across the image
- Use different smoke textures
- Consider air flow and movement
Smoke should enhance mystery without obscuring important details. It creates separation between depth layers and adds movement to static scenes.
Creating Candlelight Glow
Candles add focal light points that draw attention. Place candle stock images at strategic locations in your composition.
But stock images rarely include realistic glow. We need to paint that ourselves.
Create a new layer. Set it to Linear Dodge (Add) blend mode. Select a soft brush with warm orange color.
Paint gentle glows around each candle flame. Keep the brightness concentrated near the source, fading outward gradually.
Light painting rules:
- Light fades with distance
- Warm light for fire sources
- Paint on multiple layers
- Keep it subtle
These light sources should illuminate nearby surfaces too. Use Dodge Tool on those areas to simulate reflected candlelight.
Color Grading for Mood
Now we unify everything through color adjustment layers. Create a Curves adjustment layer above all other layers.
Pull the RGB curve into a slight S-shape. This increases contrast while maintaining detail in highlights and shadows.
Then create a Color Balance adjustment layer. Add cool tones to shadows (more blue and cyan). Add slight warm tones to highlights if you want contrast.
Color grading approach:
- Cool tones create eeriness
- Desaturate slightly for aged look
- Increase contrast for drama
- Keep skin tones believable
These adjustment layers affect everything below them. Use layer masks if certain areas need different treatment.
The right color palette transforms a collection of elements into a cohesive artistic vision.
Final Sharpening and Details
Zoom to 100% view. Look for any rough edges, color mismatches, or unrealistic elements that break the illusion.
Use a small brush to paint fine details: cracks in stone, texture in fabric, dust particles in light beams.
Add a final Sharpen layer. Go to Filter > Sharpen > Unsharp Mask. Use conservative settings: Amount 80%, Radius 1.0, Threshold 2.
Final touches checklist:
- Check all edge blending
- Verify consistent lighting
- Look for color mismatches
- Add subtle texture overlays
- Consider final crop
Step back from your monitor. Does the scene feel cohesive? Does your eye travel through the composition naturally?
What Makes This Work
This tutorial isn’t just about one specific image. You learned fundamental photo manipulation techniques that apply to any dark fantasy scene.
Key takeaways:
- Patient masking creates seamless blends
- Dodge and burn add dimension
- Atmospheric layers create depth
- Color grading unifies disparate elements
- Light painting focuses attention
These same techniques work for sci-fi scenes, surreal portraits, or conceptual art. Master the basics here, then experiment with your own ideas.
The difference between amateur and professional-looking manipulations comes down to patience with details. Each small refinement compounds into a polished final result.
Don’t rush. Build complexity gradually. And remember that sometimes less is more when it comes to dramatic effects.