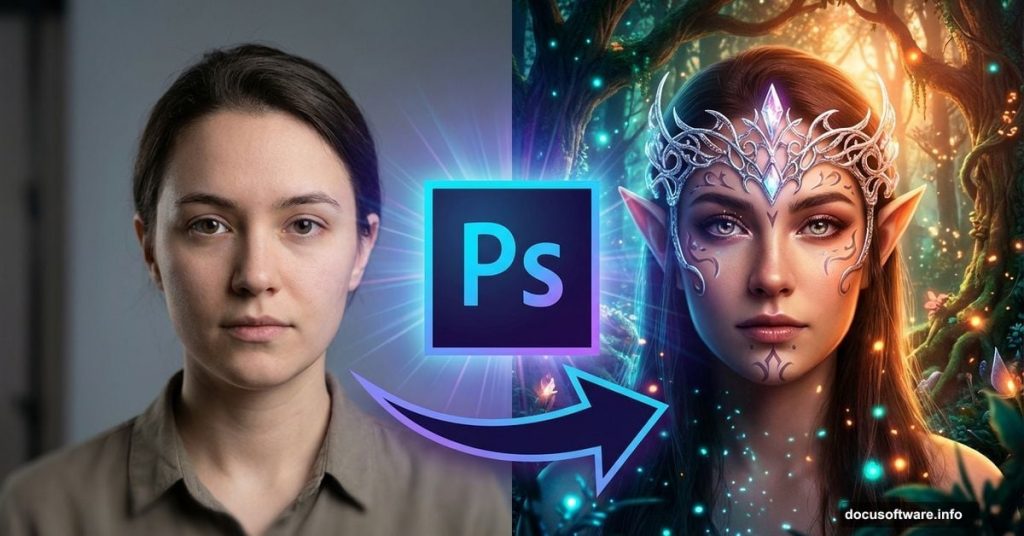
Want to turn an ordinary portrait into magical fantasy art? This elf transformation proves easier than you’d think.
Most people assume fantasy photo manipulation requires years of Photoshop mastery. But the core techniques work for beginners too. You just need patience and the right approach.
Let’s break down how to create a convincing elf portrait from a standard photo. No advanced skills required.
What You’ll Need Before Starting
First, gather your source materials. You’ll need a base portrait photo plus several texture and element images.
Essential assets:
- High-resolution portrait (front-facing works best)
- Forest background texture
- Armor references or textures
- Decorative elements (jewelry, headpieces)
- Arrow images for props
Make sure your portrait has good lighting. Flat, even lighting makes blending much easier later. Avoid harsh shadows or dramatic angles for your first attempt.
Plus, choose a portrait with visible ears. You’ll be modifying them significantly.
Set Up Your Working Canvas
Create a new document at 1607×1000 pixels. Fill it with white as your base layer.

Import your portrait using the Move Tool. Center it on the canvas. This gives you space to add background elements later without cramping your composition.
Now comes the preparation work. Before adding fantasy elements, you need a clean base to work from.
Remove Unwanted Elements First
Most portraits have distracting elements that break the fantasy illusion. Headbands, modern jewelry, visible logos on clothing – these all need to go.
Create a new layer above your portrait. Set it as a Clipping Mask so edits only affect the portrait layer.
Select a soft brush around 30-40% hardness. Sample skin tones near the areas you want to fix. Paint over distracting elements with matching skin colors.
Pro tip: Use multiple color samples. Skin tone varies across the face. Painting with just one color looks flat and obvious.
For the forehead area, use a peachy tone like #dfc8c0 for highlights. Add a slightly darker tone like #cba294 for natural shadows on the sides.
Clone Out Remaining Distractions
The Clone Stamp Tool handles larger problem areas better than painting.
Hit S to activate it. Hold Alt and click to set your source point. Then paint over the area you want to replace. The tool copies pixels from your source point to your brush location.
This works great for removing things like branches, stray hair, or accessories that don’t fit your fantasy theme.
Create a new layer for cloning work. This keeps your edits non-destructive and easier to adjust later.

Rebuild Missing Hair Sections
Cloning often leaves gaps in hair coverage. Time to paint them back in.
Make three separate layers for hair painting. Use soft brushes with colors sampled from nearby hair sections.
Hair color palette:
- Base tone: #d1b8af
- Highlights: #dfc8c0
- Bright highlights: #e3e7e8
Paint with low opacity first. Build up the hair gradually in multiple passes. This creates more realistic texture than painting at full opacity.
Focus on areas where you cloned out accessories. Those spots usually need the most hair reconstruction.
Refine Facial Features Subtly
Small adjustments to facial proportions enhance the fantasy aesthetic without looking unnatural.
Create a new layer and grab a small soft brush. Use color #d4b8ae to carefully paint along the lower lip contour. This makes the lip appear slightly smaller and more delicate.
The key word here is “subtly.” Fantasy characters still need believable proportions. Extreme changes look cartoonish rather than magical.
Add Dimension With Dodge and Burn

This technique brings depth and drama to your portrait. Professional photo manipulations always use dodging and burning.
Make a new layer and change its blend mode to Overlay at 100%. Fill this layer with 50% gray through Edit > Fill.
Select the Dodge Tool for highlights and Burn Tool for shadows. Set both to Midtones range with 10-15% exposure.
Gently paint over areas that should catch light (cheekbones, nose bridge, forehead). Use the Burn Tool on naturally shadowed areas (under cheekbones, sides of nose, jawline).
The 50% gray layer lets you see your work in Normal mode. Switch back to Overlay to see the actual effect on your image.
Adjust Background Colors
Raw photos rarely have cohesive color schemes. Adjustment layers fix this quickly.
Add a Hue/Saturation adjustment layer. Focus on the Cyans channel to shift background colors toward your desired palette. Forest scenes work well with cooler, desaturated backgrounds.
Then add a Color Balance adjustment layer. Tweak Midtones and Highlights to unify the overall color temperature.
Important masking step: Use a soft black brush on the Color Balance layer mask. Paint over skin tones, especially cheeks, shoulders and hair highlights. This prevents your subject from taking on unnatural color casts.
Building the Forest Background
Now your cleaned portrait needs a proper fantasy setting. Forest backgrounds create that mystical atmosphere.
Import your forest texture and position it behind the portrait layer. Use Free Transform to scale and position it appropriately.
The forest should frame your subject, not overwhelm them. Darker, slightly out-of-focus backgrounds work best. They keep attention on your character.
Create a layer mask on the forest layer. Use a soft brush to blend the edges where forest meets portrait. Smooth transitions sell the illusion.
Add Armor Elements Convincingly
Fantasy characters need costume elements. Armor pieces add immediate visual interest.
Import armor textures or references. Position them on your character using Free Transform and Warp tools.
Blending armor naturally:
- Match lighting direction between armor and portrait
- Use layer masks to hide hard edges
- Add shadows where armor meets skin
- Adjust colors to match overall palette
Create adjustment layers specifically for the armor. Clip them to armor layers so color changes don’t affect the whole image.
Lower armor opacity slightly at first. This makes blending easier. Once placement and shadows look right, restore full opacity.
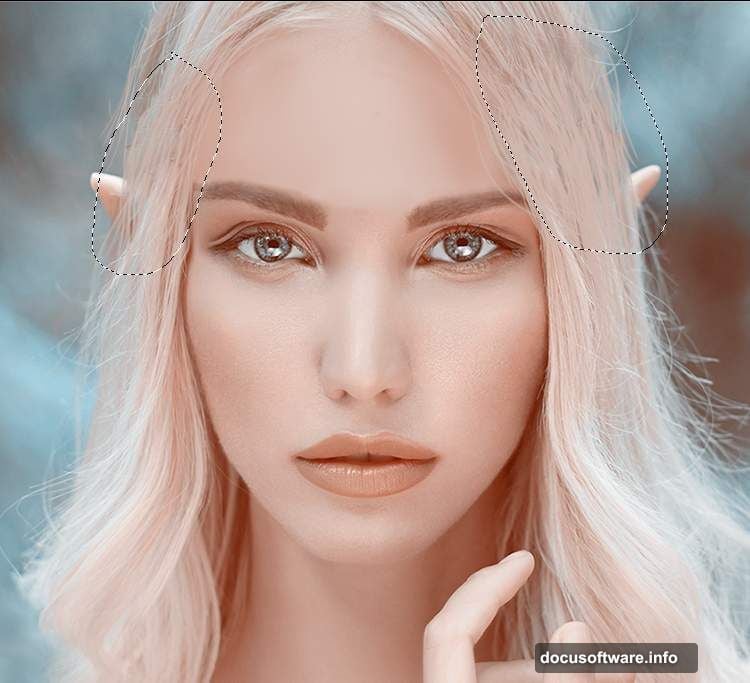
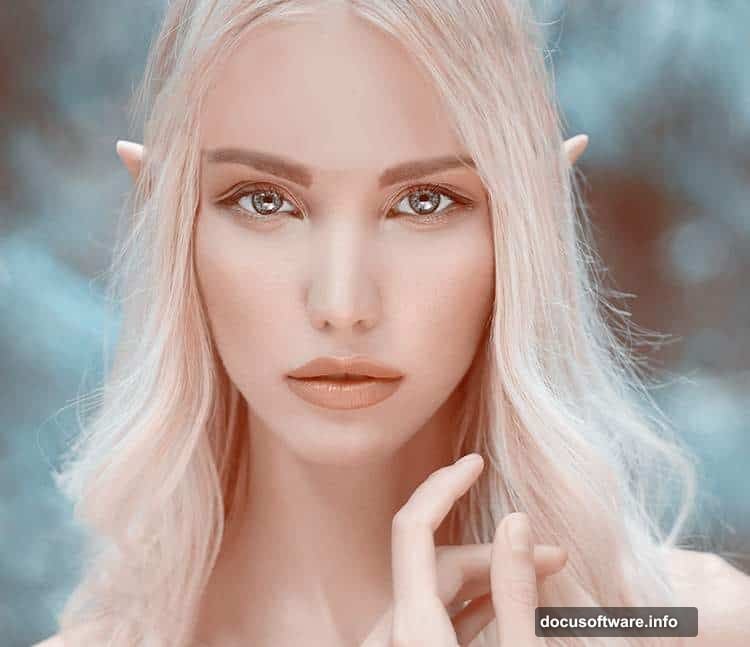
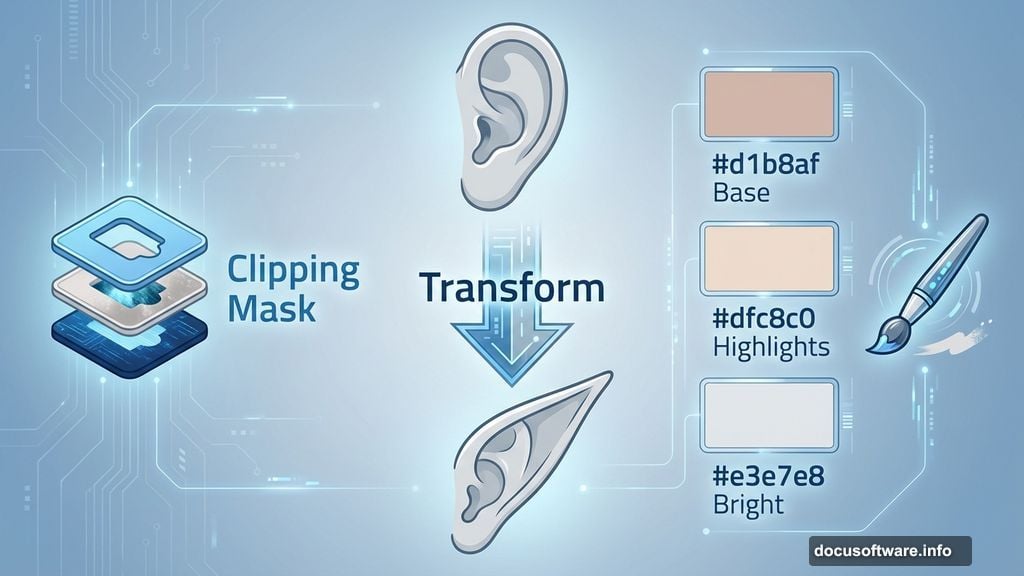
Craft Custom Elf Ears
This step transforms your portrait from human to elf. Ear modification makes the biggest visual impact.
You have two options here. Either paint ears from scratch or use reference photos of prosthetic elf ears.
For painted ears, study elf ear anatomy first. They typically extend upward and taper to a point. The tips angle slightly backward, not straight up.
Create a new layer for each ear. Sample skin tones from nearby areas. Paint the extended ear portion with a soft brush, gradually building up form.
Add highlights and shadows to match the lighting on the rest of the face. Elf ears should look integrated, not pasted on.
Style the Hair Appropriately
Fantasy characters often have distinctive hairstyles. Time to enhance what’s already there.
Use a combination of painting and warping. Select sections of existing hair and use the Warp tool to create flowing, dramatic shapes.
Paint additional hair strands on new layers. Use colors sampled from the original hair. Vary your brush size and opacity for natural-looking strands.
Long, flowing hair reinforces the fantasy aesthetic. But keep it believable – hair should follow natural movement and gravity.
Decorate With Fantasy Accessories
Headpieces, jewelry and ornamental elements complete the transformation.
Import decorative elements and position them using Free Transform. Adjust perspective with Warp or Distort tools so they follow the contours of the head and body.
Blending accessories:
- Use adjustment layers to match colors
- Add drop shadows for depth
- Create highlights where light would catch metal or gems
- Use layer masks to hide unrealistic edges
Metallic elements work especially well for fantasy portraits. Gold and silver jewelry immediately signal “not modern day.”
Add Weapons or Props
Arrows, bows, staffs or other fantasy weapons reinforce your character concept.
Import arrow images and position them logically. Maybe your elf carries a quiver on their back, or holds arrows in hand.
Pay attention to perspective. Props need to match the angle and position of your character. Wrong perspective breaks the illusion instantly.
Add shadows where props would cast them. This grounds objects in the scene rather than making them float unnaturally.
Unify Everything With Final Adjustments
Your composition has multiple elements now. Final color grading ties everything together.
Add a Curves adjustment layer at the top of your layer stack. Make subtle adjustments to the RGB curve and individual color channels.
Create a Color Lookup adjustment layer if you want dramatic color grading. These apply cinematic color schemes with one click.
Add a final Hue/Saturation layer to fine-tune overall saturation. Fantasy art typically has rich, vibrant colors, but avoid oversaturation.
Polish With Sharpening and Effects
Almost done. A few final touches enhance the professional quality.
Merge all visible layers into a new layer at the top. Hit Ctrl+Shift+Alt+E to create this composite layer.
Apply a subtle sharpen filter. Too much sharpening looks harsh and digital. Just enough brings out details in eyes, hair and accessories.
Consider adding a subtle vignette. Darken the corners slightly to draw focus toward your subject. Do this with a Curves adjustment layer and painted layer mask.
What Makes This Actually Work
Patience and attention to detail separate convincing photo manipulations from obvious fakes.
Each adjustment layer serves a purpose. Random color grading doesn’t work. Instead, think about how light would actually hit each surface.
Shadows and highlights need consistency. If light comes from the left, every element should reflect that. Mixed lighting directions scream “fake.”
Most importantly, blend everything. Hard edges between elements destroy immersion. Soft, gradual transitions keep viewers focused on your fantasy character instead of technical execution.
Your first attempt won’t be perfect. That’s fine. Each elf portrait you create teaches you something new about lighting, blending and composition.
The techniques here work for any fantasy character transformation. Fairy, warrior, mage – same core skills, different details.
So grab a portrait and start experimenting. You’ll surprise yourself with what you can create.