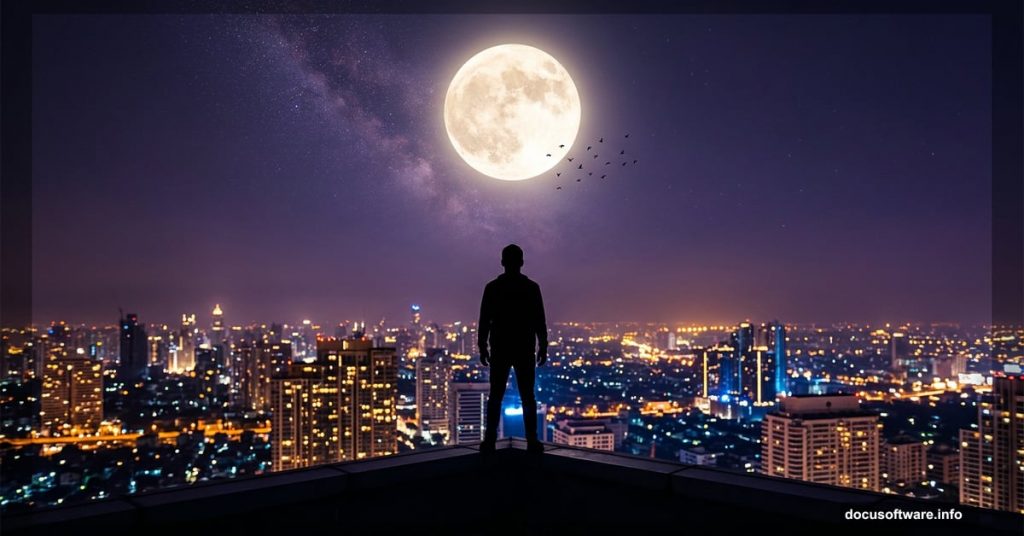
Photoshop’s real magic happens when you combine multiple elements into something that feels completely real. City lights, moonlit skies, silhouetted figures — these pieces come together beautifully when you know the right techniques.
This tutorial walks you through building a dramatic urban rooftop composite from the ground up. You’ll work with city backgrounds, glow effects, a human figure, the moon, birds, clouds, and even the Milky Way. Plus, you’ll finish everything off with Camera Raw for that polished, cinematic look.
Here’s what you need before diving in: a city image, a glow overlay, a photo of a man, moon and bird images, plus texture resources including circles, Milky Way, clouds, and stars. Grab all your assets first, then let’s get building.
Setting Up Your Canvas
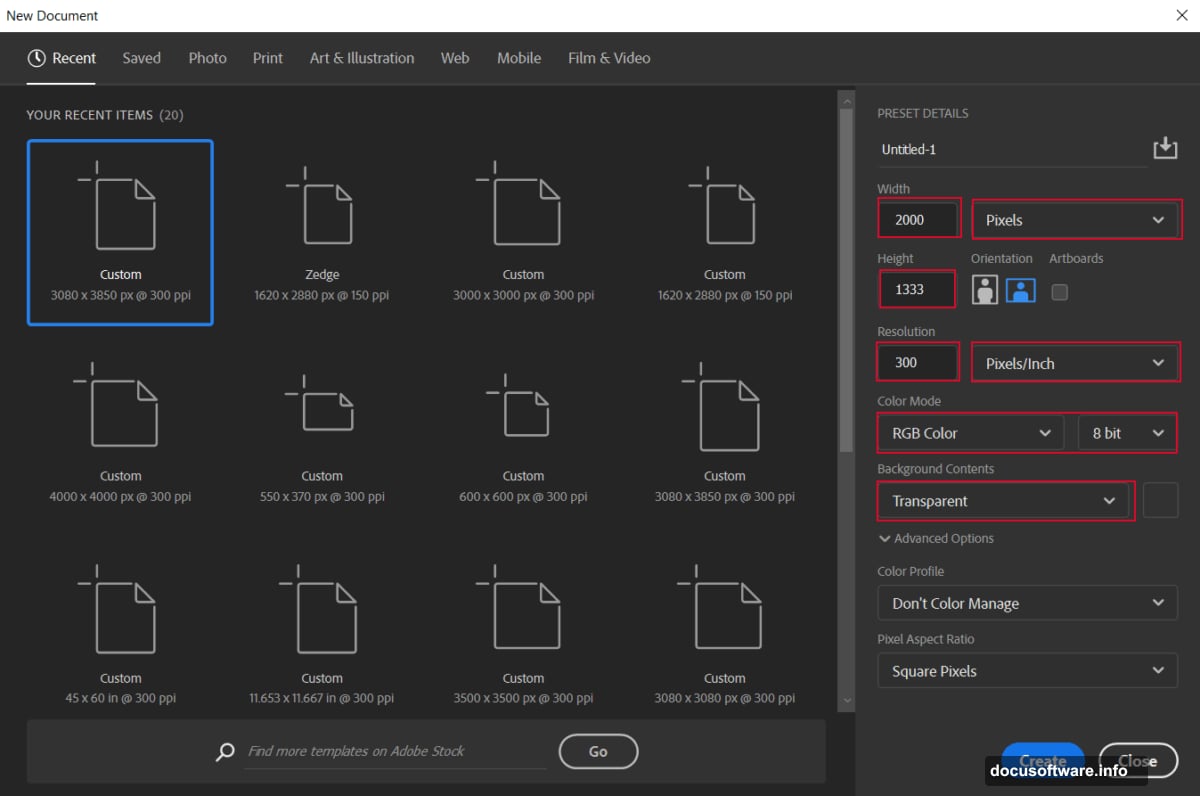
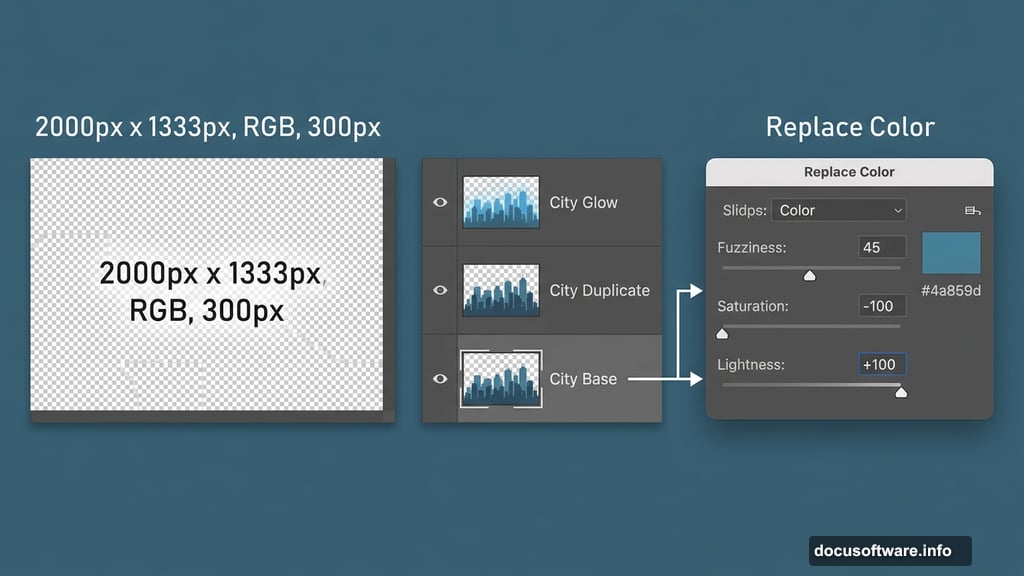
Start fresh. Go to File > New and enter these exact settings:
- Preset: Custom
- Width: 2000px
- Height: 1333px
- Resolution: 300px
- Color Mode: RGB Color, 8-bit
- Background Contents: Transparent
This gives you a high-resolution workspace with plenty of room to maneuver. The transparent background keeps your options open as layers stack up.
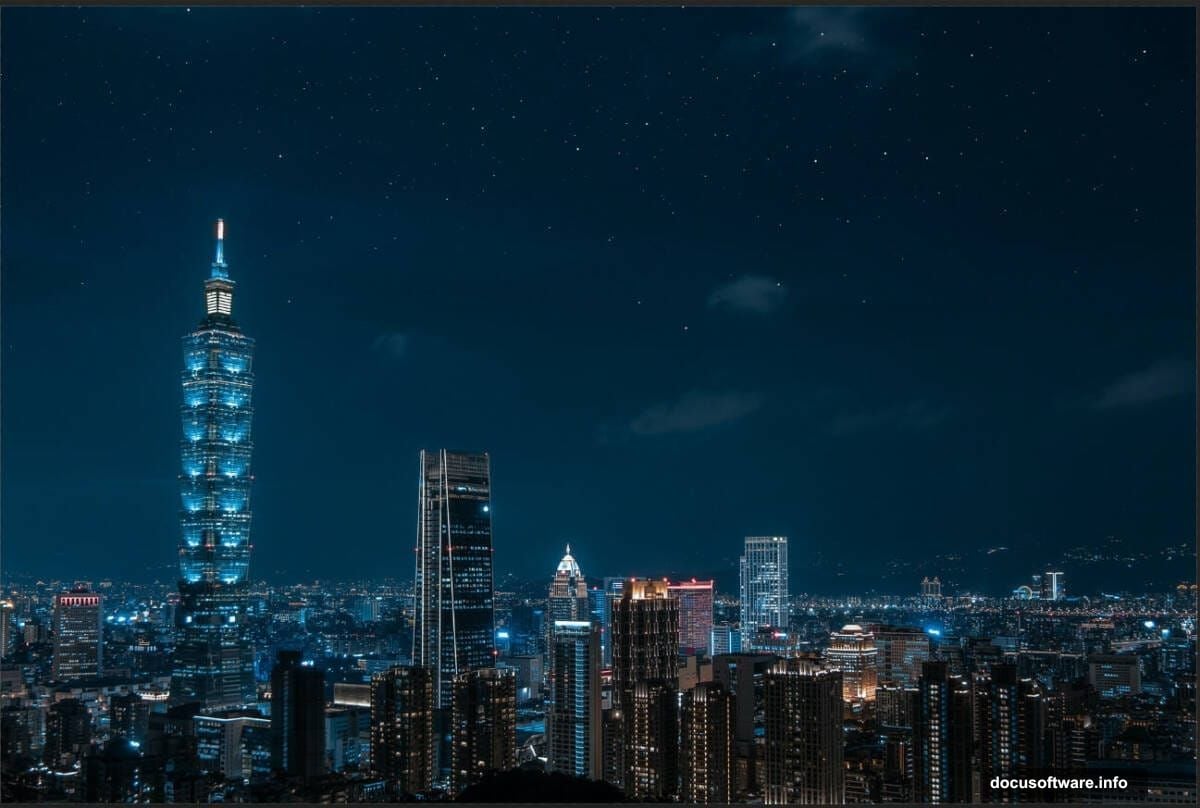
Placing and Adjusting the City Base
Go to File > Place and select your city image. Position it on the canvas using the Transform tool — that’s Ctrl/Cmd + T. Hold Alt + Shift to resize proportionally from the center. If you’re on Photoshop CC, just hold Alt alone and it handles all sides simultaneously.
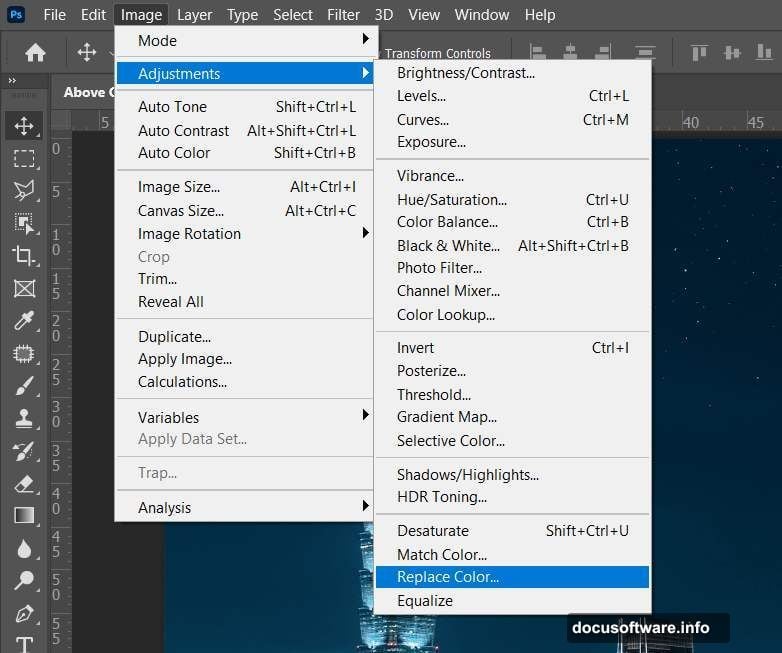
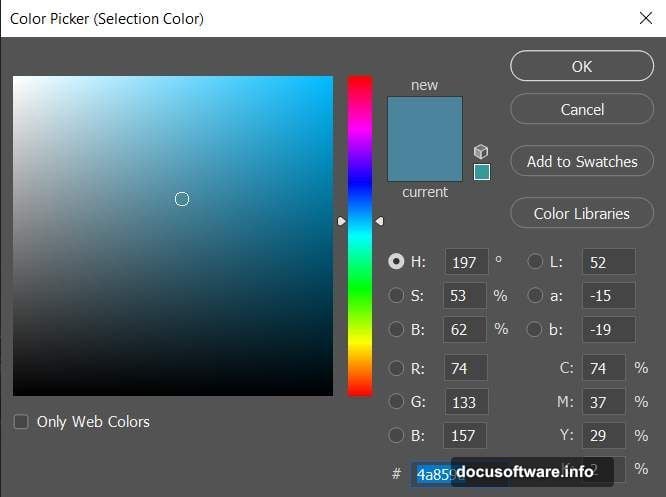
Once placed, duplicate the city layer with Ctrl/Cmd + J. Now head to Image > Adjustments > Replace Color and dial in these settings:
- Color: Blue (#4a859d)
- Check: Localized Color Clusters
- Fuzziness: 45
- Saturation: -100
- Lightness: +100
This step neutralizes the original blue tones in the city, giving you a cleaner base to build your custom color grade on top of.
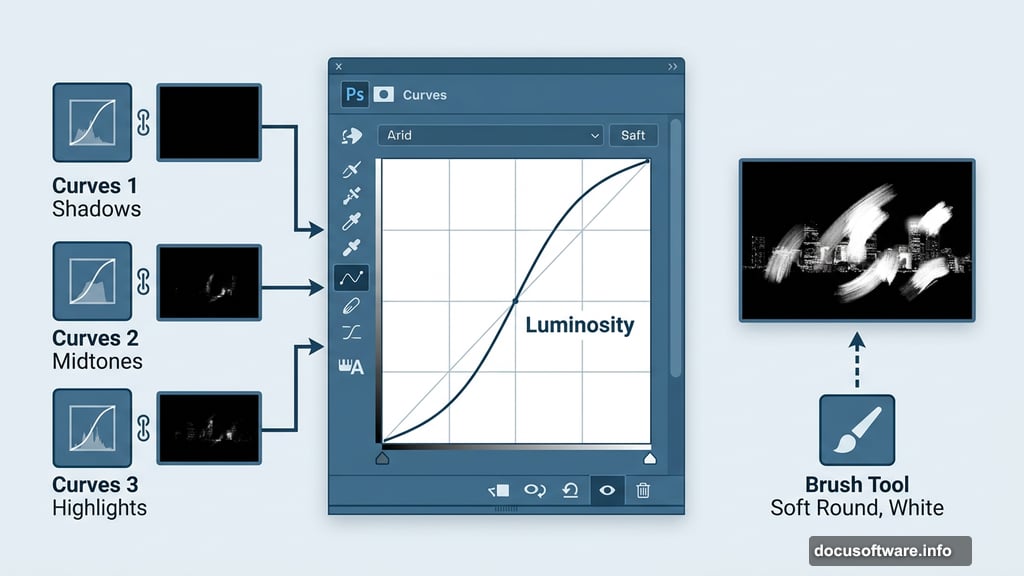
Sculpting Light With Curves Layers
Here’s where the scene starts breathing. Add a Curves Adjustment Layer to bring up the overall luminosity of the city.
Then add a second Curves layer. Press Ctrl/Cmd + I to invert the mask — it turns black, hiding the effect everywhere. Now grab the Brush Tool (B), set it to Soft Round with white as your foreground color, and paint directly onto the mask over the highlight areas of the city. This reveals your curves adjustment only where you want it, creating targeted, natural-looking light.
Add a third Curves layer for additional tonal control. Three curves layers might sound like overkill, but each one handles a different aspect of the light. Think of it like adjusting shadows, midtones, and highlights separately for maximum precision.
Adding the City Glow Effect
Go to File > Place and bring in your City Glow image. Position and resize it just like you did with the base city layer using Ctrl/Cmd + T.
Create a layer mask on this glow layer. Use a Soft Round black brush to paint away the glow from the sky and cloud areas — you only want it affecting the city itself. Then change the blend mode to Color Dodge. This creates that gorgeous, luminous city-light warmth.
Next, duplicate this glow layer twice using Ctrl/Cmd + J. Three glow layers with Color Dodge stacking on each other intensifies the effect progressively. Reduce the opacity on the duplicates if the glow gets too aggressive — you want warmth, not an overexposed mess.
Cutting Out the Man With the Pen Tool
Open your man photo via File > Open. Select the Pen Tool (P) and carefully trace around the figure.
The Pen Tool rewards patience here. Click to create anchor points for straight edges, and click-drag to create curved segments that follow the contours of clothing and hair. Work methodically around the entire figure, connecting back to your starting point to close the path.
When the selection looks right, right-click and choose Make Selection. Then create a layer mask — Photoshop applies your path as a clean cutout. This method gives you far cleaner edges than a quick Magic Wand selection, especially around complex areas like hair and jacket edges.
Blending the Figure Into the Scene
Dropping a cleanly cut figure onto a background rarely looks right immediately. The figure needs to feel like it belongs in the lighting environment you’ve created.
Add adjustment layers clipped directly to the man layer. Use Curves to match his brightness to the ambient city light. The key is painting on the adjustment layer masks selectively — darker on the side facing away from the light source, slightly brighter where the glow would catch his jacket or shoulders.
That blue rim light effect on his back comes from a masked Curves layer with inverted mask, exactly like the technique used on the city earlier. Paint white onto the mask along the edges of his silhouette where city light would bounce. It’s the detail that sells the composite as believable.
Building the Sky: Moon, Stars, and Milky Way
Place your moon image and position it in the upper portion of the sky. Use Color Dodge or Screen blend mode to blend it naturally against the dark sky — both modes drop out the black background cleanly.
Bring in your stars and Milky Way textures the same way. Screen mode works perfectly for these since stars are bright elements against black. Stack and position them to build a rich, layered night sky that doesn’t look like a single flat texture.
Add your clouds layer and mask it carefully. Soft brushwork on the mask lets clouds fade naturally at the edges rather than cutting in harshly. Adjust opacity to taste — sometimes 60-70% opacity on clouds looks more atmospheric than full opacity.
Place your circles texture and experiment with blend modes like Overlay or Soft Light at low opacity. These add subtle depth and light scatter that’s hard to describe but immediately visible in the final result.
Dropping In the Birds
Place your bird images and scatter them across the sky. Vary the sizes slightly — smaller birds feel more distant, creating natural depth. A Soft Light or Multiply blend mode at reduced opacity helps them integrate into the sky rather than sitting on top of it.
Position the flock so it guides the eye through the composition. Birds trailing from the figure toward the city in the background create natural visual flow through the scene.
Final Polish With Camera Raw Filter
Here’s the step that ties everything together. Flatten your visible layers into a merged layer at the top of the stack — Ctrl/Cmd + Alt + Shift + E creates a merged copy without destroying your originals.
Go to Filter > Camera Raw Filter. This is where you make global decisions about the image’s overall feel. Push the Temperature cooler for a more dramatic night atmosphere, or slightly warmer to emphasize the golden city glow. Adjust Clarity to add midtone contrast and make edges pop. Lift the Blacks slightly to prevent the shadows from going completely dark.
Use Radial Filters within Camera Raw to add subtle vignetting or to spotlight the figure against the city background. The goal is guiding attention while making the image feel like a single, cohesive photograph rather than assembled pieces.
When everything clicks, you’ll have a scene that feels genuinely cinematic — a solitary figure on a rooftop, city glowing behind him, stars emerging overhead.
The most satisfying part of Photoshop compositing is that moment when the pieces stop looking separate and start looking like one image. With the right blend modes, careful masking, and thoughtful adjustment layers, that moment comes faster than you’d expect. Keep experimenting with the opacity and blend modes throughout — every set of source images responds a little differently.