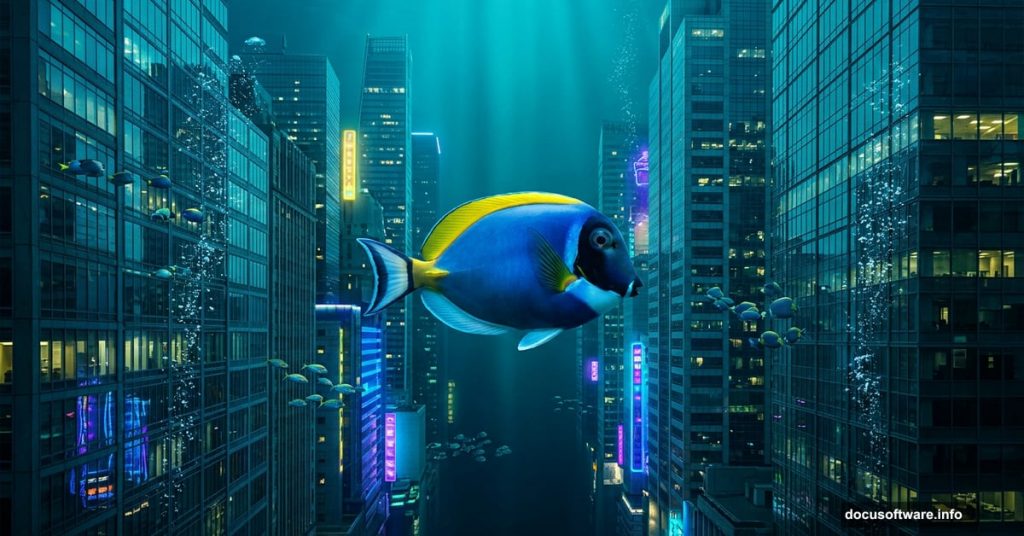
Ever wondered what a city would look like if fish ruled the streets? This photo manipulation project makes that dream a reality. We’re blending urban photography with underwater life to create something genuinely jaw-dropping.
The best part? You don’t need to be a Photoshop wizard to pull this off. Just follow along, and you’ll have a surreal fish city scene ready to show off. Here’s exactly how to do it.
What You Need Before Starting
Grab these resources first. You’ll need a city background photo, four fish images, a boy photo, and an underwater shot. Download everything and keep it organized in one folder. That simple habit saves a lot of frustration later.
Also, make sure you’re working in Photoshop CC or a recent version. Some shortcuts mentioned here behave slightly differently in older builds.
Step 1: Open and Duplicate Your Background
Start by opening your city photo. Go to File > Open and select your background image.
Next, duplicate the layer immediately. Press Ctrl/Cmd + J to create a copy. Always work on a duplicate. That way, your original stays untouched if something goes wrong.
Step 2: Cut Out Your First Fish with the Pen Tool
Now open Fish 1 through File > Open. This is where the real fun begins.
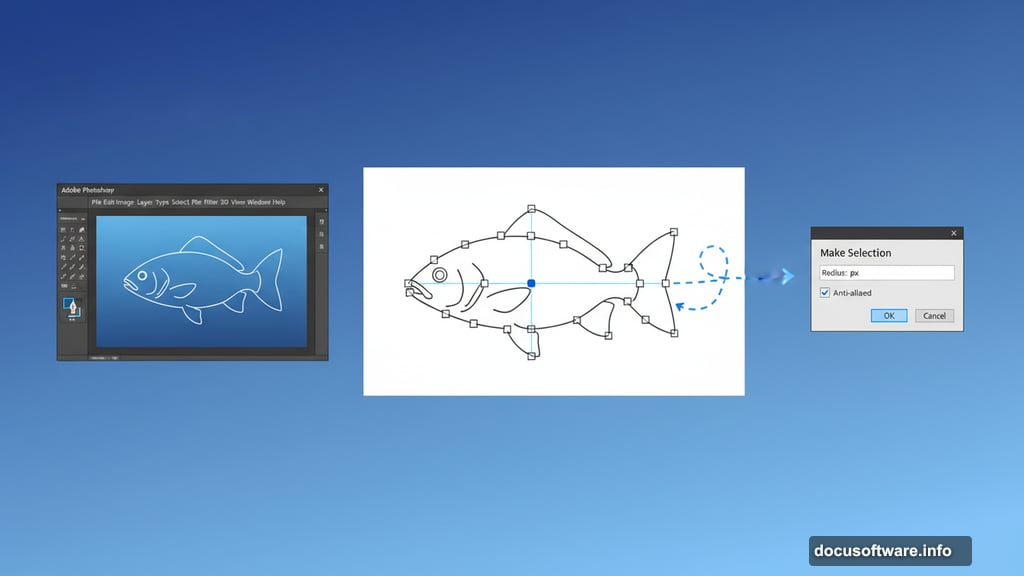
Select the Pen Tool (P) and start tracing around your fish. The Pen Tool creates precise anchor points along the edges, giving you a much cleaner cut than any automatic selection tool. Click to place your first anchor point, then keep clicking around the fish outline to build your path.
A few things to remember while tracing:
- The last anchor point you place always shows as a solid square
- Older anchor points turn hollow as you continue
- To close your path, hover back over your first anchor point until a small circle appears, then click
Once you’ve traced the full outline, right-click and choose Make Selection. Set the Feather Radius to 0px and check Anti-aliased for smooth edges.
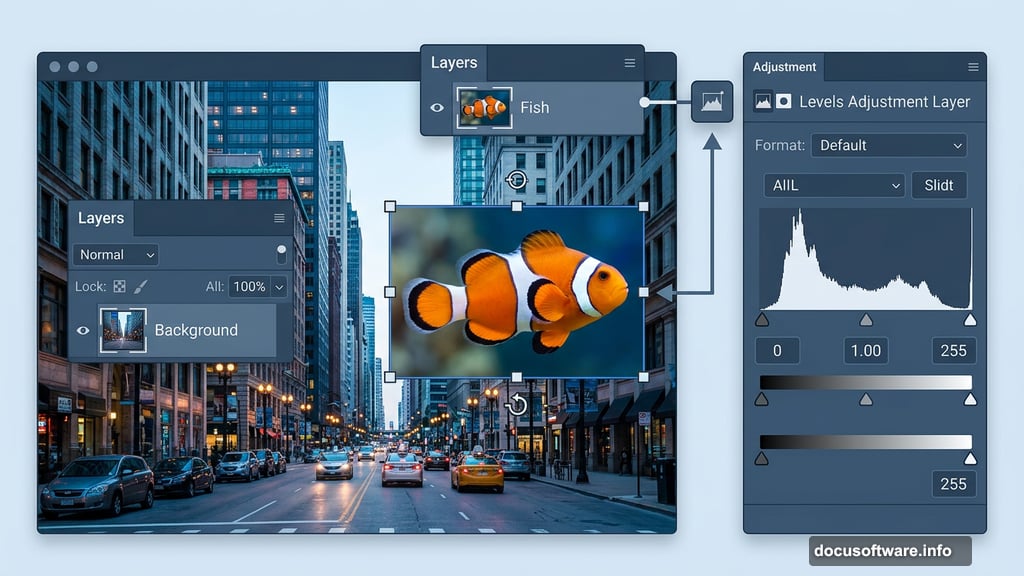
Copy the selection with Ctrl/Cmd + C and paste it onto your city canvas with Ctrl/Cmd + V. Use the Transform Tool (Ctrl/Cmd + T) to resize and position the fish. Hold Alt + Shift to scale proportionally in older Photoshop versions. In Photoshop CC, just hold Alt and all sides scale together.
Finally, add a Layer Mask and grab the Brush Tool (B). Set it to Soft Round with black as your foreground color. Paint over any rough edges or parts of the fish that need to blend into the scene more naturally.
Step 3: Add a Levels Adjustment Layer
Pop in an Adjustment Layer > Levels on top of your fish layer. This corrects the tonal balance between your fish and the background, making the fish feel like it actually belongs in the city scene rather than floating awkwardly on top.
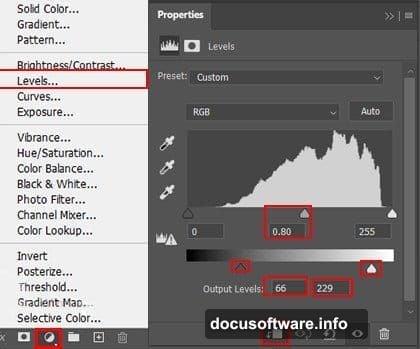
Tweak the shadows, midtones, and highlights until the fish matches the overall lighting of your background image.
Step 4: Paint the Edges for Depth
Create a new blank layer above the fish. Select the Brush Tool (B) with a Soft Round tip and set your foreground color to #8d9aad (a cool blue-gray tone). Set the brush Flow to 10% so the paint builds up gradually.
Lightly paint around the edges of the fish. This subtle color haze helps the fish appear embedded in the city atmosphere rather than cut and pasted.
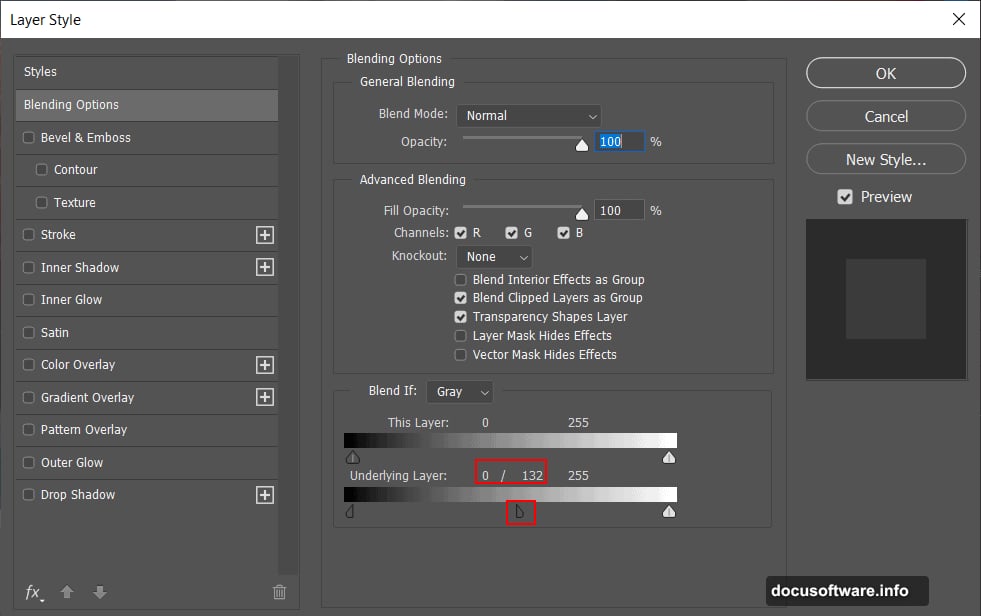
Here comes a neat trick. Open Blending Options for this layer, find the Underlying Layer slider, hold Alt, and drag the slider to the right. Holding Alt splits the slider, which creates a smooth, gradual blend between your painted edge color and the layers below. It’s one of those small techniques that makes a huge difference.
Step 5: Desaturate Slightly with Black and White
Add an Adjustment Layer > Black and White but drop its Opacity to 30%. You’re not going full grayscale here. Instead, you’re just toning down the saturation slightly to help your fish match the moodier city tones.
Think of it as giving everything a slight cinematic filter. Colors still show through, but with a more restrained, atmospheric quality.
Step 6: Bring the Fish Eye to Life
Create a new layer specifically for the eye. Set its Blend Mode to Color Dodge and Opacity to 26%.
Grab the Brush Tool (B) with Soft Round selected and use gray (#808080) as your foreground color. Gently paint over the eye area. The Color Dodge blend mode interacts with the layers below to create a subtle glow effect, making the eye look alive and slightly luminous without overdoing it.
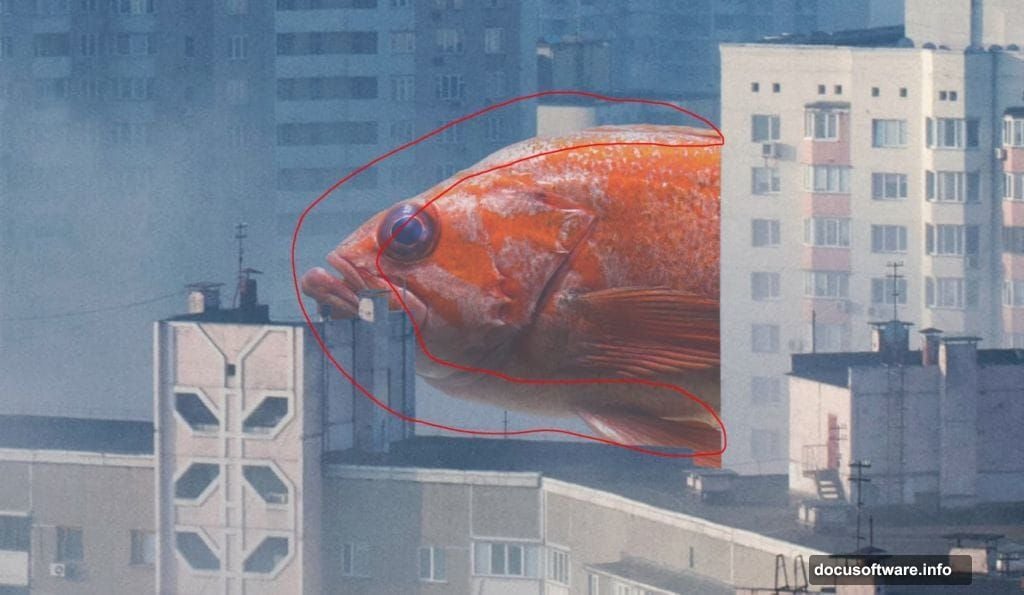
Step 7: Add Fish 2 with Quick Selection
Open Fish 2 and this time use the Quick Selection Tool (W) instead of the Pen Tool. Click and drag across the fish body and Photoshop will automatically detect the edges based on color contrast.
Quick Selection works best on fish with strong contrast against their backgrounds. If the edges look rough after selecting, use the Refine Edge or Select and Mask option to clean things up.
Once selected, copy and paste the fish onto your main canvas. Use the Transform Tool again to scale and position it. Think about visual balance. Where does this second fish make the composition feel more dynamic?
Add a Layer Mask and use the soft brush technique from Step 2 to blend the edges into the scene.
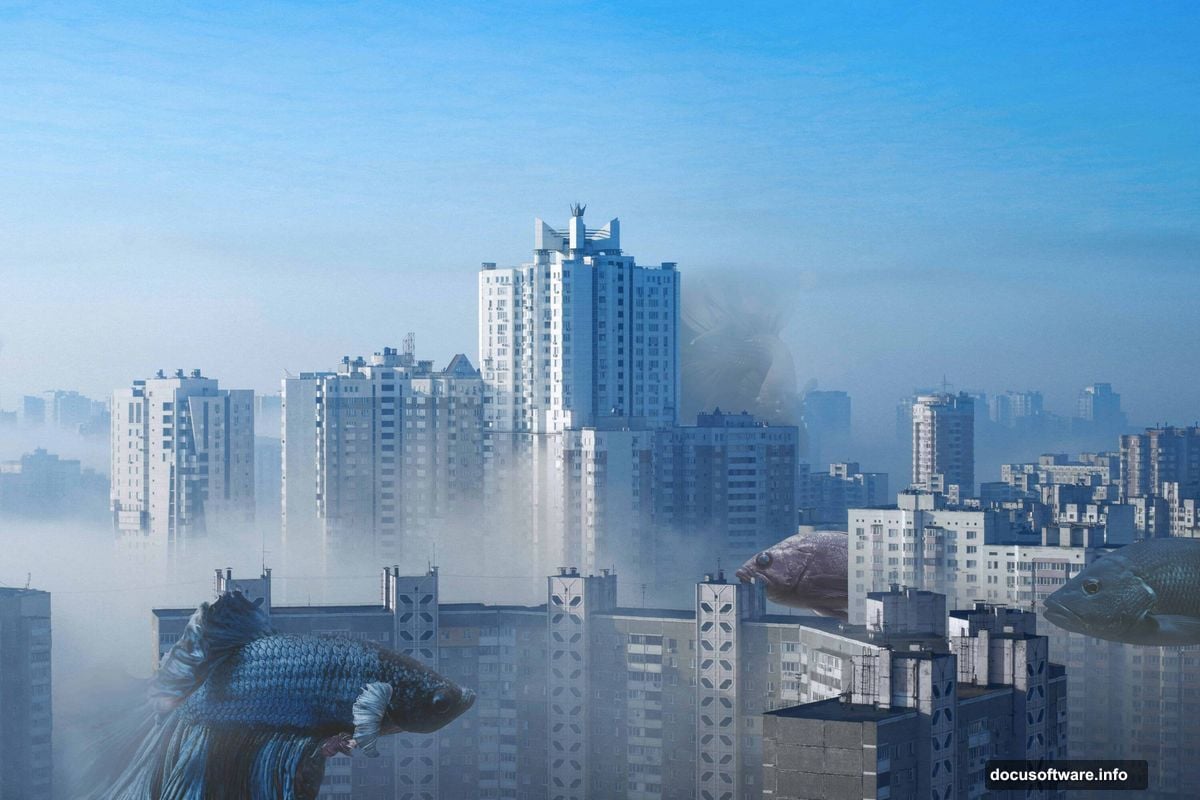
Step 8: Continue Adding Fish 3 and Fish 4
Repeat the cutout and blending process for your remaining fish. Vary their sizes and positions across the cityscape. Some fish might work better overlapping buildings. Others might look great swimming through gaps between structures.
Each fish needs its own set of adjustments. Don’t just copy-paste the same Levels settings from Fish 1. Spend a minute on each one because the lighting and color often differ slightly between photos.
Step 9: Add the Underwater Layer
This is where the composition really comes together. Open your underwater photo and place it above your city background but below your fish layers.
Adjust its Opacity so the underwater texture bleeds through without completely covering the city. Somewhere between 40% and 60% usually works well, but trust your eye here. You want the viewer to sense both the city and the water simultaneously.
Step 10: Bring in the Boy Photo
Add the boy image using the same cutout method. The Pen Tool works best here for clean, precise edges around a human figure.
Position the boy in a way that anchors the scene. Placing him in the foreground or middle ground gives the viewer a human scale reference, which makes the surrounding fish feel even more surreal and enormous by comparison.
Match his lighting to the overall scene using Levels and a slight Hue/Saturation adjustment.
Step 11: Polish Everything with Camera Raw Filter
Flatten your visible layers into a merged copy by pressing Ctrl/Cmd + Alt + Shift + E. This creates a single merged layer you can work on without destroying anything beneath.
Go to Filter > Camera Raw Filter. This is your final color grade. Here you can push the scene into a specific mood. Try boosting the Blues and Cyans in the HSL panel for an oceanic feel. Drop the Clarity slightly for a dreamier look. Add a subtle Vignette to draw the eye toward the center.
Camera Raw gives you the kind of cinematic control that makes the final image feel cohesive rather than like a collection of separate photos stuck together.
Photo manipulation projects like this are genuinely one of the most satisfying things you can do in Photoshop. The skills you practice here, Pen Tool selections, adjustment layers, blending options, and Camera Raw finishing, all transfer directly to any other compositing work you tackle next.
Start messy, iterate often, and don’t stress about perfection on the first pass. The second fish city you build will be dramatically better than the first, and that’s exactly the point.